For anyone who has spent much time with Architectural Desktop's roof tools, the term "lacking" takes on a lot of weight. In the earlier days of ADT, the Roof object was actually on its way to becoming a rapid layout tool but its limits brought about the newer Roof Slab object which, though far less limited, is also virtually "unintelligent".
One of the biggest problems with Roof Slabs is that they are independent objects with no connection and thus no "intelligence"; if you adjust one slab, for example, others do not follow suite. The benefit of working with Roof Slabs, however, is that they offer solutions very close to Mass Elements; including Mitering, Trimming, Extending and various Boolean operations.
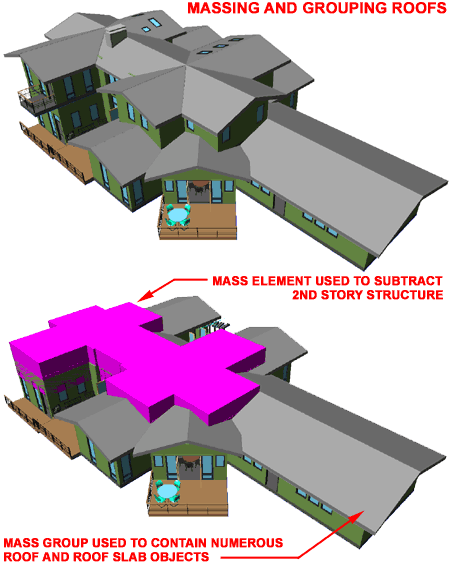
An ideal Roof object would combine the cohesive nature of the Roof object with the flexible edition offered by the Roof Slab object. One day, while working on a complex roof design, I decided to use the Mass Group with Roofs and Roof Slabs in order to attain some sort of cohesion between the numerous objects I had created to create my roof design.
Illustrated to the right is an example of a residential project where one 45 degree roof creates a bit of a complex roof intersection on the first floor of a two story house. Below, I outline many of the steps and techniques you can employ to create similar results without a lot of fuss. You can also learn far more about all of the techniques discussed here by subscribing to our Architectural Desktop eGuides. For the topics discusses here, you will need to read our Architectural Desktop 3 Pre-design eGuide and our Architectural Desktop 3 Development eGuide.
Illustrated to the right I show an example of a roof structure consisting primarily of the Roof object but with one Roof Slab object just to show that you can mix the objects. Generally, I always try to create the Roofs I need with the Roof object and only use Roof Slabs when it becomes necessary to utilize the features offered by this object.
Also illustrated to the right is an example of how two intersecting roofs may not join properly and later I will show a new trick for solving this irritating problem ( one that does not require conversion to Roof Slabs ).
You may also notice that the Gable Walls have been drawn together with the Roofs. At ARCHIdigm, we have found that designing Roofs as separate plans can be a lot easier to manage than trying to put everything in one file. To deal with the Wall to Roof connection issue, we draw Walls on the Roof Plan. By using this technique, we can leave all Walls on the regular Floor Plans with a level normal top plate height. When the Plans are all Xref'd together everything looks okay with the exception of a seam line between the floor plan(s) and roof plan(s) Walls.

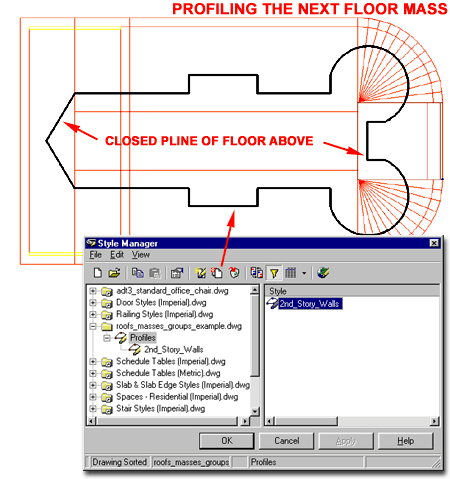
Illustrated to the right I show an example of how you can use the Pline object to trace an outline of the opening you may want in a roof design; for such things as another floor, an atrium and so on.
Once you have drawn the Pline shape, as illustrated to the right, you can use the "ProfileDefine" command to activate the Style Manager filtered for Profile Definitions ( see dialog box, right ). To create a Profile Definition, all you have to do is create a new Profile Name and then use the Set From button ( or via right-click on the mouse ), to Select the Pline shape. Once you have Selected your Pline shape for the Profile, you can use the Apply button and OK your way out of this dialog box.
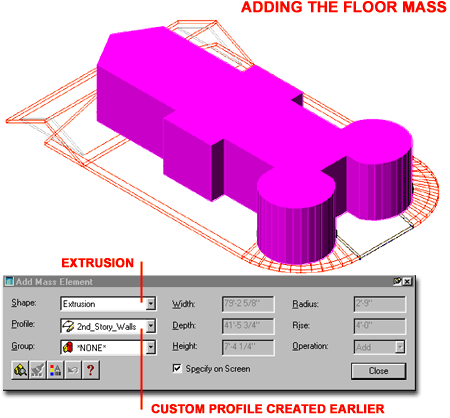
Illustrated to the right I show how you can now Add a Mass Element based upon the custom Profile Definition created above. On the Add Mass Element dialog box, set the Shape to "Extrusion" and the Profile to the Profile Name created in the previous step.
When you Add the Mass Element, simply provide enough Height to make sure that it will pass through all of the Roofs that you want to cut an opening through.
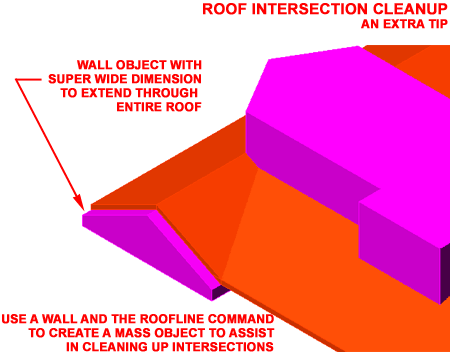
Illustrated to the right I show that I have used a Wall object drawn below the Roof to match the inside slope and then given it an enormous Width value so that it passes completely through both gable ends.
To make a Wall match the Pitch ( Slope ) of a Roof, simply use the RoofLine command with the AutoProject option.
Once this gable wall object has been created, it can be used as part of the Boolean Subtraction operation discussed below.
Subscribers: you can now read an expanded write-up on this very topic in the latest posting of the Architectural Desktop 3 Development eGuide.
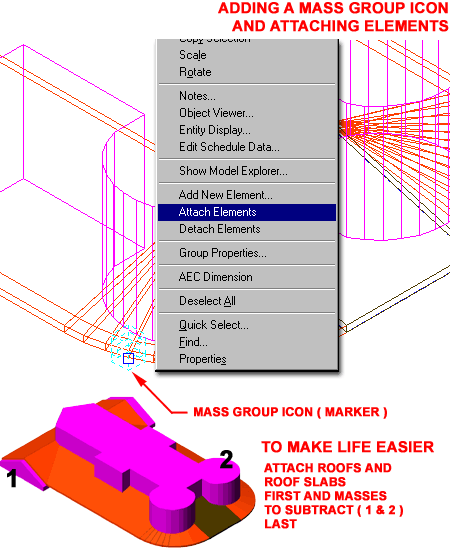
Illustrated to the right I show the pivotal part of how this trick works: by using the MassGroupAdd command to add a Mass Group Marker to the current drawing, we can now Attach all of the objects that comprise the Roof.
The Mass Group Marker ( basically an icon ) can be positioned wherever you please but I typically anchor it near or on the actual Roof. This object, by the way, does not show up well in Shaded mode.
Once you have added the Mass Group Marker, you can Select it, right-click on you mouse and use the object-specific pop-up menu to work with the Attach Elements option. Select all of the Roof and Roof Slab objects first and then select the Mass Elements, Walls and other "subtracting" objects at the end.
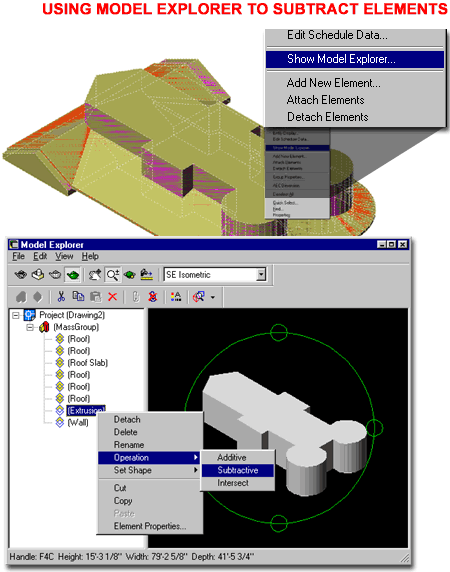
Illustrated to the right I show the Model Explorer Window and an expanded view of all of the objects that were Attached in the previous step. Each Attached object will be Additive elements by default and thus you will need to change the "subtractive" elements to act as Boolean subtractions. To change an Attached object, simply right-click over it in the Model Explorer and select Subtractive via the Operation cascading menu ( illustrated ).
Once you have finished assigning the proper Operators to your objects, the resultant roof object should prove to be rather impressive.
If you have any problems with the result, you may have to shuffle the elements within the hierarchy to get a correct solution. To "shuffle", simply pick on the element icon in the left-hand pane of the Model Explorer and drag the icon to a new location. Usually, the objects doing the subtraction, would be below those objects they are subtracting from.
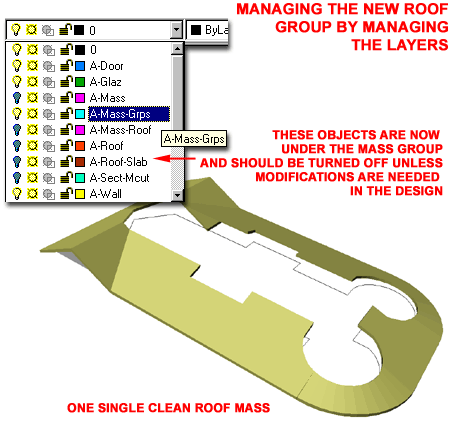
Illustrated to the right I show the resultant Mass Group Roof as it will look after all of the unnecessary objects have been turned off. A Mass Group is not really a new object so you cannot delete everything used to create it. It is, in fact, a "Wrapper" over those objects which were Attached to it and it will always reflect the Operators assigned to those objects as well as their shape and location.
The benefit of using a Mass Group is that you can change it very quickly by adjusting the Attached objects.
The downfall of the Mass Group is that you have to deal with all of the objects by working carefully with your Layers (as illustrated to the right ). The other downfall to using Mass Groups is that you cannot differentiate the Colors, Linetypes and Lineweights so Soffits, Gutters and other components of your roofs will all be homogenous in appearance.
Overall, the viability of using this solution depends upon the user and the project. For early schematic work we find this solution incredibly useful. As a project becomes more refined, we find that we either generate correct roofs with the Roof Slabs or simply use 2D linework for Roof Plan Construction Documents.