I have been tinkering with new uses for the Curtain Wall Object in ADT since it was first introduced and I continue to make breakthroughs that bring a smile to my face. On a recent project I needed several coffered ceiling solutions that would allow for some tweaking and I just knew that the Curtain Wall was the perfect solution; except for one major problem, Curtain Walls don't display horizontally in Plan.
Because I have also been tinkering with Mass Groups since they were first introduced in ADT, I figured that by combining a Curtain Wall with a Mass Group I would have the solution I was seeking. Below are the steps I took to create one solution for coffered ceilings.

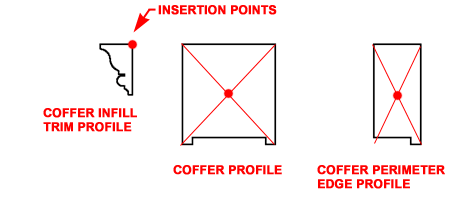
Coffered ceilings come in all sorts of configurations but in the illustration to the right, I show the three primary components that you may want to prepare for before building the actual Curtain Wall Style In this example, I used the Pline command to draw a profile for the perimeter edge, the main coffer beams and decorative trim for use up inside each coffer.
Use the Profile command to Define each Profile and be careful about picking the Insertion Points; though you can adjust these later on. Also, it's very easy to create overly detailed profiles that will do little but slow your system down.
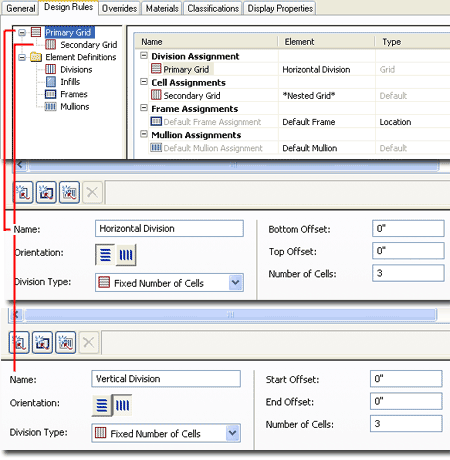
For this example I show that I have created a very simple Curtain Wall Style that uses a Fixed Number of Cells (3) for the Horizontal and Vertical Divisions.
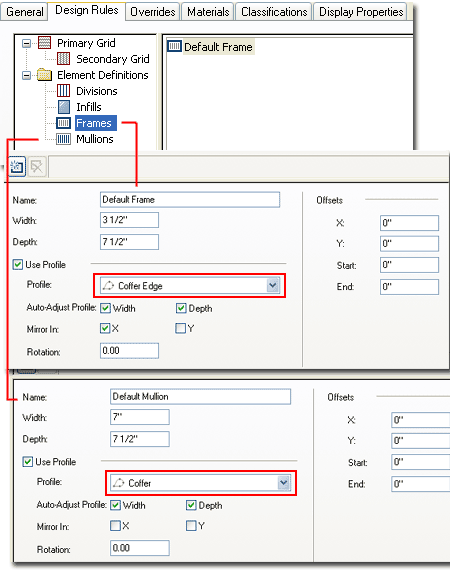
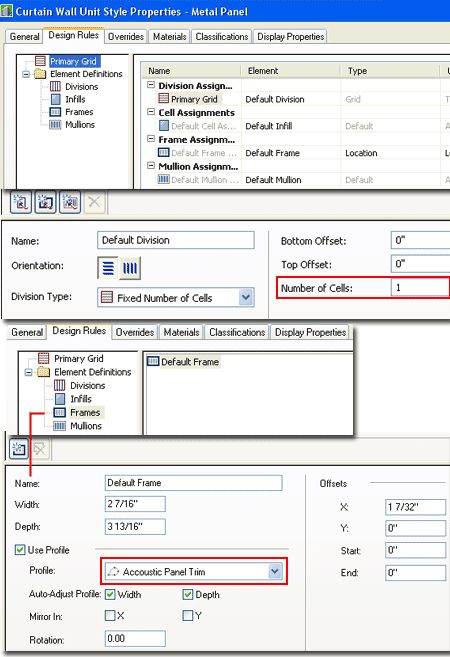
After setting the Divisions, I show that I have set the Default Frame to use the Coffer Edge Profile created earlier. For the Default Mullion I show that I have set the Coffer Profile, also created earlier.
For best results, set the Width and Depth to exact same values as defined by the Profiles. After reviewing the results of these settings, you may find that one or more of the two Profiles requires Mirroring (as shown, right, for Default Frame).
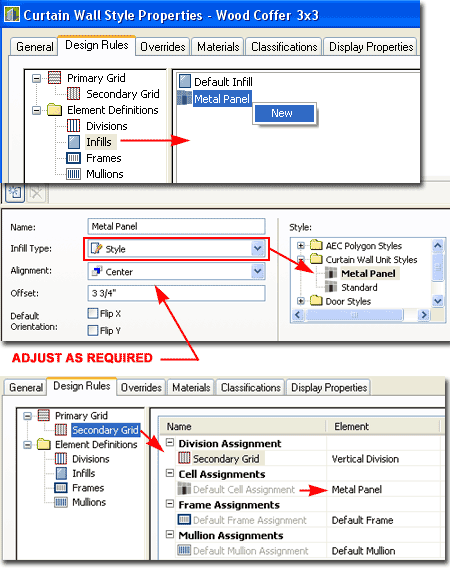
You could set values for the Default Infill, above, and have a fairly good working example of a Coffered Ceiling but I wanted to add a little extra detail by using a Curtain Wall Unit Style. Thus, to follow along, exit the Curtain Wall Style dialog and activate the Curtain Wall Unit Style (type CwUnit) dialog.
Illustrated to the right I show that I have created a new Curtain Wall Unit Style that is based on a single Cell Division and uses the trim Profile, created earlier, for the Default Frame.
Think of this as the actual ceiling component, such as acoustic panels, copper tiles or simple gypsum board. Use the Default Infill Panel Thickness value to set how thick you want your ceiling component.
Exit this dialog and return to the Curtain Wall Style.
Back on the Curtain Wall Style dialog, I show that I have created a New Infill Name and set it to an Infill Type of "Style". This allowed me to Select the Curtain Wall Unit Style created in the discussion above.
Use the Offset value and the Alignment dropt-down list to position the infill as you see fit relative to the perimeter frame and internal coffer beams.
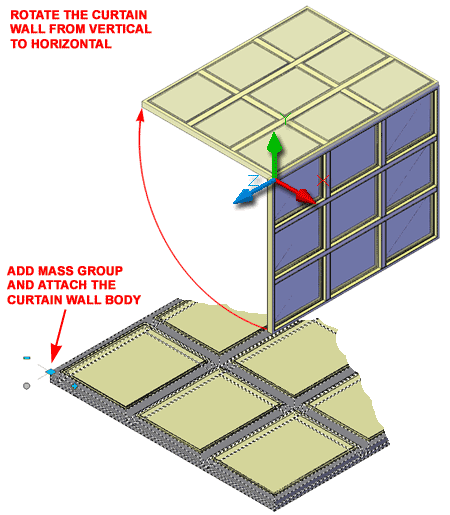
Once you have a Coffered Ceiling Curtain Wall Style, you will have to draw it but Curtain Walls will only display correctly when drawn in Plan standing up as a Wall. This is a good way to draw it but you will eventually need to Rotate the Curtain Wall so it is orientated as a ceiling object - see image right.
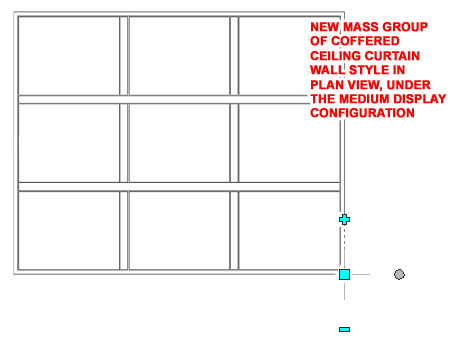
Before you attempt to view your Coffered Ceiling in Plan View, be sure to use this trick: add a Mass Group and Attach the Curtain Wall to it.
In the illustration to the lower right, I show how I have used the "MassGroupAdd" command to add a MassGroup Marker and Attach the Curtain Wall. To keep the Plan Display simple, I chose not to Attach the Curtain Wall Unit Infills but you can certainly experiment on your own.
Illustrated to the right is the final product for this example exercise as viewed in Plan View under the Medium Display Configuration. Remember that Mass Groups have their own Display Representations. Also, Mass Groups become homogenous and thus it is impossible to show different Materials within one Group; another good reason for not Attaching the Infils.