Illustrated to the right is an example of one of the most difficult types of Materials to Map correctly in AutoCAD and Architectural Desktop. The problems are as follows:
1. A single Roof object with multiple planes of slope does not automatically present each slope as a separate face for material mapping.
2. Materials are generally designed for single plane or face Attachment and do not readily map to multiple planes on one object.
3. Even if Mapping tools are employed to get a Material to Map correctly to multiple faces, getting unique edge conditions is rarely part of the solution.
In the world of game design there's a concept that I am starting to appreciate and its called "skinning". The way it works is that you have one bitmap image that holds all of the sides of the object that it will be mapped to. In the case of the Sims characters, for example, the skin is a complete person and it is wrapped around a 3D figure so that eyeballs land where they should be and fingers on the ends of the hands instead of the toes.
We can apply a similar concept to an Architectural Desktop Roof. Illustrated to the right I show a roof in plan view that I want to skin with a standing seam metal roof material. In order to create a perfect roof skin, I will need to get the proportions of my roof into Photoshop where I will draw the lines of the seams.
By using a little known export command in AutoCAD and Architectural Desktop, called SaveImg, you can export screen shots in very clean file formats such as .tga and .tif.
In the Illustration to the right, I have used the Hide command to remove any unwanted lines below my Roof Object and then used the SaveImg command to export the screen shot in .tif format.

After exporting the image of my Roof Object from Architectural Desktop, I can now open this image in any raster editing program that can work with .tif images.
Illustrated to the right, I show that I have opened my Roof Object Image and Cropped it as close as possible to the very outer edges. I also show that I am in the process of drawing all of the standing seams and edge seams base on the image I opened.
For the edges, use a wider line than for the seams.
In AutoCAD and Architectural Desktop, when using Bump Maps as Material Attributes, white areas represent high or raise spots while black areas represent the level of the object the Material is Attached to.
Illustrated to the right, I show that I have used Photoshop's Invert tool to turn all of my black lines into white lines and all of my white areas into black areas. This means that all of the white areas will now read as high spots.
Once the image is done, it should be saved with the smallest number of colors possible to avoid any odd interpretation when used as a Bump Map. In other words, if there are any gray lines or other shades they will not read as simple highs or lows but ranges in between. This image to the right was saved as a 2 Color .gif.
Once the roof skin has been saved, it is ready for use in AutoCAD or Architectural Desktop.
Illustrated to the right, I show that I have used the Materials Library to <- Import "Blue Metallic" into the current drawing. By using the Modify... button on the Materials dialogue box, I have accessed the Material Attributes and set the Bump Map Attribute radio button active.
For the Bump Map, I show that I have used the Find File... button to locate the roof skin image created in Photoshop above. I have also set the Bitmap Blend to a low ( 0.13 ) value as a starting point so the seams will not appear too extreme.
The next part of getting the roof skin to work involves making a few adjustments to how it is applied to the Architectural Desktop Roof Object. To make such adjustments, you can use the Adjust Bitmap... button to access the Adjust Material Bitmap Placement dialogue box illustrated below.
In order to get the roof skin concept to work properly, it pays to look over the Adjust Material Bitmap Placement dialogue box for the Bump Map Attribute and see how it will be applied to objects.
Illustrated to the right, I show that I have set the Map Style to "Fit To Object" so the roof skin is matched exactly to the Roof Object from which it was created.
I have also unchecked the Use Auto Axis since the roof skin will automatically look right when stretched over the roof slopes. I have found that using Auto Axis is not that big a problem but can make for strange results on the fascias. I recommend trying both with and without Auto Axis for your particular Rendering Requirements.
Once the Material has been created and Modified with a Bump Map Attribute, it is time to Attach it to an Architectural Desktop Roof. If you only have one Roof object in your drawing, then you can use the Attach by Layer method illustrated to the right. If you have several Roofs in your drawing, you will need to use either the direct Attach < method or the By ACI.. method ( assuming the Roof has a unique color ).
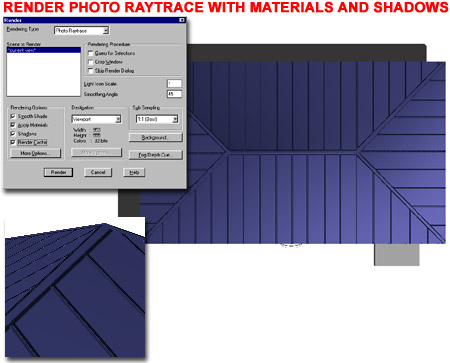
Once the Material has been Attached to the Roof Object, it is simply a matter of Rendering to test the results.
Illustrated to the right, I show that I have used Photo Raytrace as my Rendering Type with Smooth Shade, Apply Materials and Shadows checked. The Light source is a single Direct Light set as a California Sun in the middle of Summer.
Remember that you can work with the Material and the Bump Map's Bitmap Blend value to control how the skin will affect the Materials appearance.
For more tips and the full story on Rendering in AutoCAD and Architectural Desktop, subscribe to our Architectural Desktop 3 Presentation eGuide.