Over the last couple of years I have received numerous inquiries about creating animations in AutoCAD Architecture but my response has been to shrug of my shoulders because this subject hasn't been high on my list of priorities. I have to admit that I just haven't shifted out of my old habits and still prefer to use Viz for this type of work. VizRender is no longer part of AutoCAD Architecture so unless you have another Rendering and Animation product, you are limited to the same set of tools that regular AutoCAD users must work with.
I have finally found some time to look into creating Rendered Animations with AutoCAD and AutoCAD Architecture and below is an introductory overview of how to create an exterior movie. For anyone trying to get started, this should get you on your way but there is much more to be discussed and I will attempt to write more articles on this subject in the future.
In my opinion interior rendered animations are far more difficult to create than exterior ones so I will start with a simple exterior example.
In the illustration to the right I show a small house in Plan View. Around this house I have drawn an irregular closed curve with the "3DPoly" command. Paths can be drawn with Circles, Rectangles, Polylines and so forth but the reason I chose to use the 3D Polyline is that this particular Object type can be modified in all three dimensions.
Illustrated in the lower right I show how I used the Grip points on the 3D Polyline to adjust the Z-axis up and down according to how I felt the Camera should move as it travels around the house.
Objects to be used as Camera Paths don't have to be closed but if you want your movie to loop in a way that feels natural, I recommend that you close your path.
To configure a Camera to produce any Animation, rendered or otherwise, you must use the "AniPath" command which activates the "Motion Path Animation" dialog. This dialog has a very rudimentary set of options that should be self-explanatory.
In the illustration to the right I show that I have used the "Link camera to" "Path" option and Selected the 3D Polyline created earlier. For the "Link target to" option I chose to use a "Point" and Osnapped to the Midpoint of the roof's ridgeline.
If you leave the Target set to Path, your Camera will focus on the path as it travels along it. This is a neat option but won't keep the Camera on the building.
Under "Animation settings" I have set the Frame rate (FPS) to the lowest value I feel comfortable with. The default of 30 frames per second is better but requires far more frames to be rendered and thus more time. The Number of frames is actually a mathematical formula connected to the Frame rate and the Duration so I prefer to focus on the Duration. For my first test run, I have set the Duration (seconds) to a very low value because all I really want is for AutoCAD to create the automatic View that it uses to save this Motion Path information - see comments below.
Once you have created your first run with the Motion Path Animation dialog, you should find that this action creates a new Named View as illustrated to the right.
When you use the Motion Path Animation dialog to create a new Camera, it automatically uses the current View information. This may mean that you end up with a Camera Lens setting of 50mm (the default). However, after you have run that first output, you can use the "View" command to access the "View Manager" dialog and change the Lens as I show to the right where I have set the Lens to 35mm.
Outside of the "Lens length" and "Field of view" settings, the View options don't really matter when it comes to Animated Cameras so don't get confused by things like the "Animation" group (it's all gray anyway).
Note:
AutoCAD and AutoCAD Architecture uses the term "animation" just about
anywhere an option exists to make something transition over time. This
means that saving a series of Pans, Zooms and Orbits is considered an
"animation".

You can address the subject of Lighting for a Rendering or Rendered Animation before you even start to look at the Motion Path Animation dialog but I am getting to it now because I didn't need it for my first test run; lighting and shadows add time.
Since this article is about an exterior Rendered Animation, I will use the Sun to take care of all my lighting needs. You can access the Sun settings by typing "SunProperties" or from the View pull-down menu (View > Render > Light > Sun Properties...). If the "Status" of the Sun is "Off", you are likely to get an alert dialog when you turn it "On". I recommend that you use the "Turn off the default lighting (recommended)" option but this will affect the way your Visual Styles appear since the default lighting won't be active: use the "DefaulLighting" settings to go back if you want.
 Once
you have activated the Sun, you can spend a bit of time playing around with
a lot of cool settings like the Sun Angle Calculator
and Sky Properties.
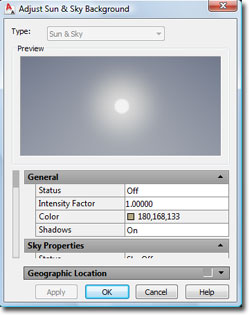
For this example I will use the "Sky Background" and, since I live near the
default Geographic location, I get to leave the Geographic Location as is.
Once
you have activated the Sun, you can spend a bit of time playing around with
a lot of cool settings like the Sun Angle Calculator
and Sky Properties.
For this example I will use the "Sky Background" and, since I live near the
default Geographic location, I get to leave the Geographic Location as is.
If you find that you cannot access the Sky options, you may need to change the "LightingUnits" to 1 or 2. The setting is often 0 in older drawing files.
Note:
Another setting that affect the appearance of your lighting is the Render
Exposure; type "RenderExposure"
to access this dialog. It is particularly useful for interior work.
After configuring your Sun Properties, you will need to configure how you want to Render each frame as the Camera travels around its Path.
Illustrated to the right I show the Render Presets Manager dialog, type "RenderPresets", where you can Copy any of the default Render Presets to create your own. To the right I show that I have created a copy of "Medium" and named my new one "Medium2". This will allow me to make changes to the settings and save them for future use in this drawing. You may not need to take these steps in your early experiments but I believe it is important to know how to create and access settings that will be available under the Motion Path Animation dialog (see below).
Note:
The "RenderPresets" command should be available on the pull-down menu or the
Render toolbar but it isn't. Instead, you can access it from the
Advanced Render Settings Palette; use Select Render Presets drop-down and
select Manage Render Presets...
After creating a Path, adjusting the Camera View, setting the Sun Properties and possibly creating a custom Render Preset you can revisit the Motion Path Animation (type "AniPath") dialog to produce a movie.
Illustrated to the right I show that my Motion Path Animation dialog has the Path and Target information from my earlier run. For this run I have decided to keep the Frame rate at 20 though 25 or 30 would look smoother. I have decided to set my movie for a Duration of 20 seconds and with the 20 Frame rate, this will require 400 frames. Rendering a single frame can take anywhere from seconds to minutes so lets say one frame takes an average of about 30 seconds (30sx400 =12000s/60s =200min/60min =3.33hrs). One problem with this calculation is that not all frames render at the same rate and things like reflective glass take longer than a wall of wood. High quality can easily keep your machine busy for hours and hours which is why professionals use "Render Farms".
Under the Visual Style category you should find a drop-down list with all of those Render Presets discussed above and any Visual Styles currently defined in your drawing. Visual Styles don't incorporate Rendering settings but can produce movies that are more stylized and less "realistic".
Next, you will need to chose an output Format and output Resolution. For Format you should find three choices, .avi, .mpg and .wmv. I tested the .avi output and found that it crashed my default Vista 64 media player so I used the .mpg format instead. The .mpg format is likely your best "bang for the buck" when you measure file size to quality. I ran a test to compare files sizes and the .avi file came out at ten times the size of the .mpg file.
Resolution will have a significant impact on the length of time it will take to Render each frame and the file size so pick something appropriate for your anticipated use. I show that I set mine to 640x480 because I found that the lower resolutions were blurry.
The final choice of "Corner deceleration" will be a matter of preference based on experiments but I find that it creates a smoother motion so I have it on.
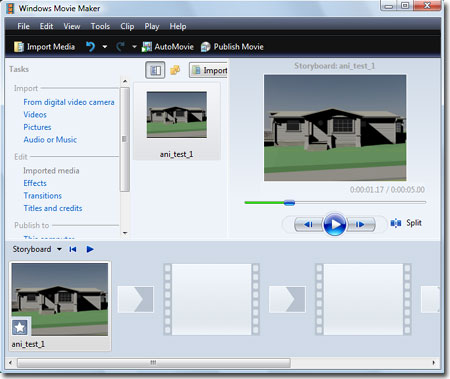
Hopefully I have provided just enough information here to get you into trouble. I'm not a big fan of Rendered Animations simply because I feel that it takes too much time to produce a relatively small amount of eye-candy. As you will soon discover, high quality Rendered Animations will keep your machine busy for hours; even days. High quality still shots, however, can be knocked out fairly quickly; they can be modified in Photoshop or re-Rendered with changes to Materials, time of day and so on. A 3D DWF can provide a client with a lot more "entertainment".
Having said that, I like looking at Rendered Animations just as much as anyone else and it is great to see that anyone using AutoCAD or AutoCAD Architecture can now produce cool movies.