I am by no means an expert on computer rendering but I am able to produce images that satisfy my clients and if you use Architectural Desktop so should you. I was motivated to write this brief article based on two observations I have made in the last month: one being the response of piers looking at my sample work and the other being on-line dribble on a variety of blogs and discussion boards suggesting that out-sourcing to India is smarter, cheaper and better. One argument elaborated on the difficulty of learning how to create quality renderings and that employers wouldn't spend the money for employees to learn. Why do some people attempt to convince the world of the reasons behind their own limitations?
With the introduction of VizRender in the Architectural Desktop package, quality renderings have never been easier and if you can use ADT, then you can create a rendering.
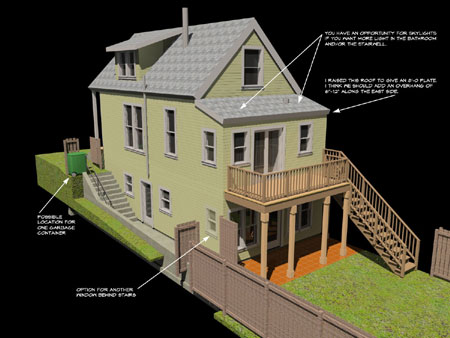
There are numerous ways to create a single building model in Architectural Desktop and none of them really matter with respect to Rendering. In the illustration to the right I show that I have assembled a composite model using ADT's Project Navigator but that is just a fancy way of saying I Xref'ed several plans together.
When you have a model that you want to Render, be sure to provide some form of a base such as the actual site or just a big rectangular mass. This will serve to catch shadows and block background imagery such as a sky. To follow this exercise you don't even need a complete building, you can do this with one floor and no roof.
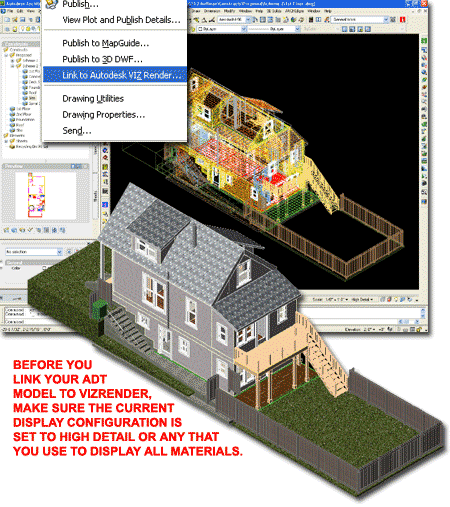
Before you link your model to VizRender from Architectural Desktop, be sure to set the current Display Configuration to something that provides a display of all the Materials you want to render. I tend to use High Detail because I design a lot of my Object Styles to only display Materials under this Display Representation.
Be sure to Save your file before taking the next step.
When you are ready to go, you can use the "Link to Autodesk VIZ Render..." menu option via the File pull-down menu or simply type "VizRender" on the command line. Once activated, you should see the VizRender splash screen as this product is loaded. It may take a few minutes, depending on the complexity of your model, for VizRender to load and import the ADT model.
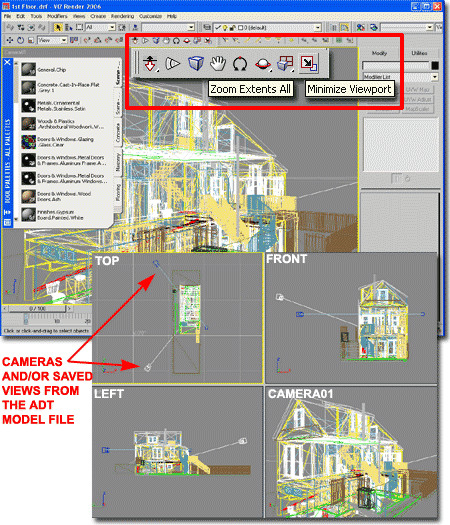
Once VizRender has loaded and established an Xref-like link to the ADT model file, you should see a single Viewport similar to that illustrated to the right. For first time users, VizRender can be a little confusing but you will soon find similarities to AutoCAD and ADT.
In the illustration to the right I show the "Viewport Navigation Tools" with two very important tools that you will need to use immediately: "Minimize Viewport" and "Zoom Extents All". When you pick on the Minimize Viewports button, you will find that the working screen area divides into four equal Viewports; by default these will be assigned as Front, Top, Left and whatever the current one was set to. You will need these Viewport Views in order to place the Sun and any Cameras that you may want to add.
The second button you will need to use is the Zoom Extents All so that each Viewport is Zoomed in to an optimum size. I find that you often have to pick on this button twice to get good results. Sometimes, you may need to pick in each Viewport and adjust as required by rolling your Wheel forwards or backwards.
Once you have
your four Viewports, you can pick in the Top Viewport and
add a Sun.
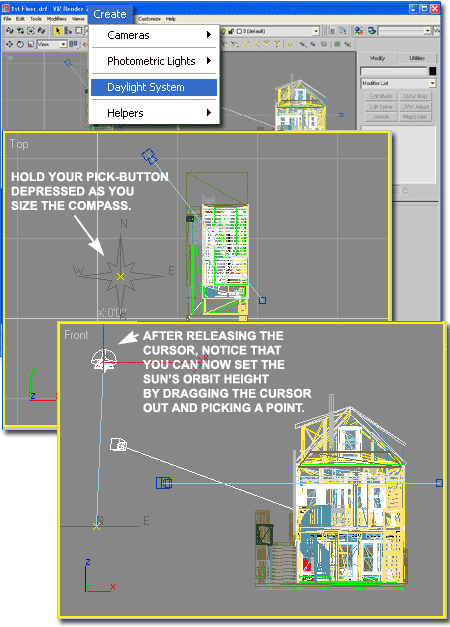
To add one Sun, you can use the Daylight System
button
or use the Create
pull-down
menu
 as
illustrated to the right.
This action
typically triggers the Daylight Object Creation alert dialog that offers to
automatically change the exposure control; accept this by using the Yes
button. Be aware, however, that it is almost impossible to create
interior renderings using interior lights while in Daylight mode. I
solve this problem by using another copy of the composite model to rendering
interiors where I don't use the Daylight system.
as
illustrated to the right.
This action
typically triggers the Daylight Object Creation alert dialog that offers to
automatically change the exposure control; accept this by using the Yes
button. Be aware, however, that it is almost impossible to create
interior renderings using interior lights while in Daylight mode. I
solve this problem by using another copy of the composite model to rendering
interiors where I don't use the Daylight system.
When you
place the Sun Object in the
Top Viewport, pick somewhere off to the side of your
building
 so
you can see this Object. Then, continue to hold your pick-button
depressed so you can drag the cursor out and establish a good size for the
Sun's
Compass icon.. It really doesn't matter how big the Compass icon
is but it helps when it's big enough to see and Select. After setting
the size of the compass, you should notice that you still need to provide
another value using your cursor and this is for the Sun's orbit height.
For this value I typically jump into the
Front
Viewport
and set a height
that is comfortably above my building(s).
so
you can see this Object. Then, continue to hold your pick-button
depressed so you can drag the cursor out and establish a good size for the
Sun's
Compass icon.. It really doesn't matter how big the Compass icon
is but it helps when it's big enough to see and Select. After setting
the size of the compass, you should notice that you still need to provide
another value using your cursor and this is for the Sun's orbit height.
For this value I typically jump into the
Front
Viewport
and set a height
that is comfortably above my building(s).
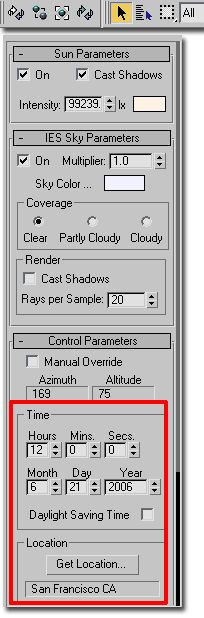
If you make a mistake, use the Select Object button (see image top left), Pick on the Sun icon or the Compass icon and then hit the Delete key. Use the Daylight System tool to Add a new Sun. You can actually have many Suns for different times of the day and these can be turned On or Off via the Modify Palette.
Once you have placed your Sun, you should see that the Modify Palette, on the right of the VizRender Window, offers several cool settings; including, On, Partly Cloudy, Hours, Minutes, Seconds and the "Get Location..." Geographic location button.
Use these settings to set your sun as you would like to have it in your first Rendering.
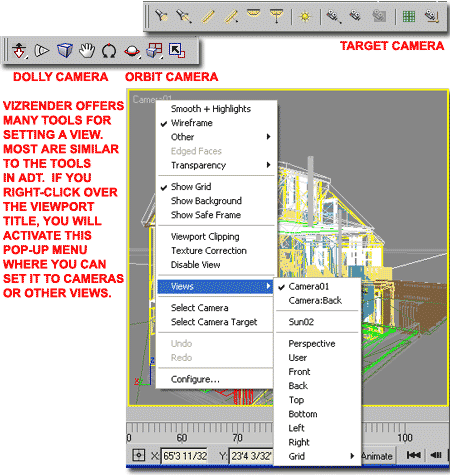
After you have placed and adjusted your Sun, you will need to set a Viewport for the Rendering image. VizRender comes with many tools for working with perspectives and it even imports Saved Views from ADT and converts them into Cameras.
Illustrated to the right I show that I placed my cursor over the lower right Viewport title and activated a pop-up menu. You will need to do the same in order to Select any predefined Camera or Named View imported from the ADT model. If you create a new Camera in VizRender using the Top and Front Viewports, for example, you can use this pop-up menu as well to set the Camera current.
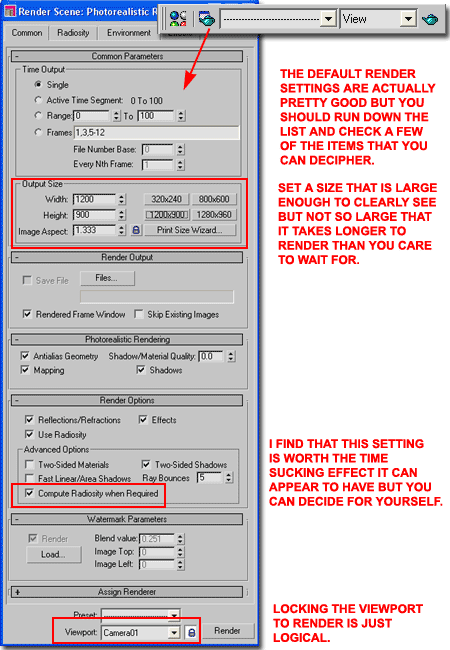
Once you have a Sun and a Viewport with a perspective shot that excites you, it will be time to tackle the Render Scene dialog. The Rendering toolbar has a teakettle button that you can use to activate the Render Scene dialog but don't confuse this with the Quick Render button.
There are many settings to work with on the Render Scene dialog but all I want to achieve in this article is to convince you that it isn't difficult to create good renderings. Later, you can explore other settings and read other material to improve your work.
1) I recommend that you pick an Output Size that is just large enough for you to see the details that matter to you but not so small that you miss things. Smaller sizes are generated faster.
2) Radiosity is a process used for high quality rendering work that calculates bouncing light rays. This can prove to be a major time-sucking process but with one Sun and no other lighting, the default settings for Radiosity should not be too bad.
3) Under the Viewport drop-down list, notice that you can assign a Camera or other View Name. I recommend that you assign the current Camera and then use the little Lock icon so you avoid accidental Rendering of other Viewports as you tinker with Materials, Lights and Cameras.
On the Environment tab of the Render Scene dialog you will find the "Environment Map" button where you can set any raster image as a background.
Illustrated to the right I show that I have picked on the Environment Map button and navigated may way to "C:\Documents and Settings\All Users\Application Data\Autodesk\ADT 2007\enu\Textures" in order to find one of the crude sky offerings that come with this package: "sky.tga".

Use the Render button on the Render Scene dialog and wait for the results to appear in a separate Window. Depending on your computer hardware, the size and complexity of your model, materials and other factors, it may take several minutes for the first rendering to appear. As you might expect, things like glass and chrome that reflect a lot of information will contribute to a slower rendering process.
One really cool thing about Radiosity in VizRender is that once it has been calculated, it can be reused for all other Cameras so long as you don't change Materials, Lighting, Backgrounds and so on.
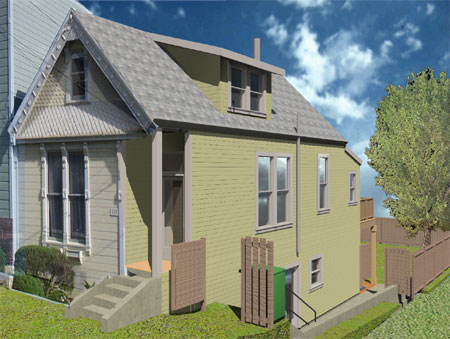
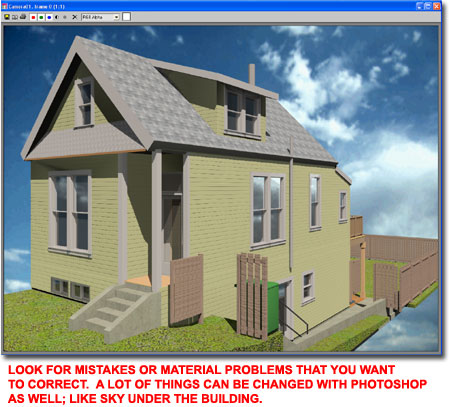
An image like the one to the right can be Opened in Photoshop or equivalent software and "dressed up" to look more like those stock images you see in magazines. It's amazing what a little vegetation will do to make a Rendering more appealing and perhaps more believable. You can also create composites with real digital site photos to add adjacent buildings. I often use the Distort tool in Photoshop to fake-match the perspectives.
Illustrated to the right I show how a digital photo can be inserted and distorted to provide more realistic detailing. This example is not perfect, it's not even correctly matched at the top but the angles were completely different and yet I think it is effective at communicating design intent.
If you have been holding yourself back believing that rendering is difficult then I hope this article has inspired you to give it a try with an attitude of, "I can do better than this guy".