Recently one of our readers wrote to me about how to create a material in ACA and this basic question turned into something that required a whole article to explain. Since Autodesk introduced Material Definition Styles in ACA, I think a lot of users became confused by the term "Material" because it is easy to equate with Rendering. In this article I will attempt to explain how Material Definition Styles work in ACA and provide a trick for accessing a lost file.

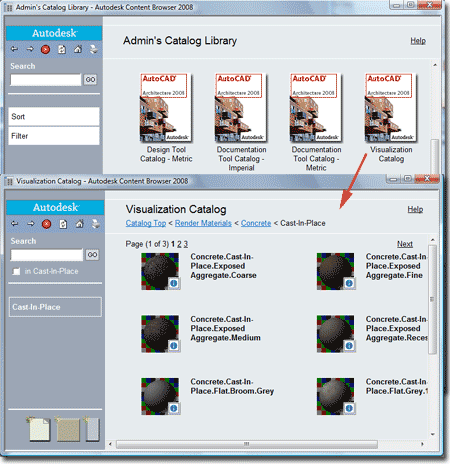
I would imagine that most ACA users are importing their "Materials" through the Visualization Catalog where you can see a sample image of a fairly extensive collection of render-ready materials. The only problem with this approach to importing materials is that you aren't importing a Material Definition Style but simply the render-ready image.
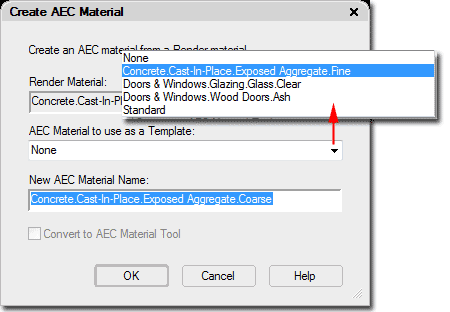
Have you notice how the "Create AEC Material" dialog (see image below right) always pops up when you drag a material in from the Content Catalog?
The reason this occurs is that ACA needs to assign the render-ready material, an image file, to an actual Material Definition Style so you can attach this Style to Objects.
When the "Create AEC Material" dialog pops up, you can use any of the existing Material Definition Styles in the current drawing as a Template for the creating of a new Material Definition Style in which the render-ready material is assigned. The only real problem with this approach is that outside of the render-ready material, the two Material Definition Style will appear identical. This means that hatch patterns, colors, lineweights and so forth will be identical for both Material Definition Styles. In some cases that might be okay but in other cases you probably want a completely different appearance.
Note:
It is better to use an existing Material Definition Style as a Template than
to use the "None" or "Standard" option because these two won't look anything
like any of the other Material Definition Styles that automatically come in
with Objects from ACA's Library.
Once you have created a Material Definition Style, you can assign it to one or more Components of an Object either as a Display Property Override or via the Matieral's tab of the Object Style's Properties dialog.
In the illustration to the right I show that I have assigned a Concrete Material Definition Style to a Component of a Wall Style. I also show that I have used the "Edit Material" button to access the Material Definition Properties dialog. You can type "MaterialDefine" to access all of the Material Definition Styles in the current drawing.
Be sure to observe that just about every Material Definition Style uses Style Overrides because there is only one Material Style. The Style Overrides allow each Material Definition Style to have unique Display Properties; including render-ready materials.
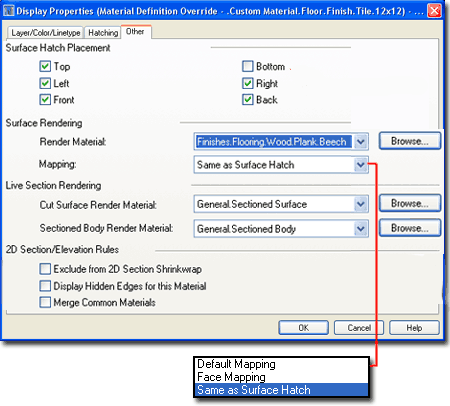
In the last dialog to the right I show that I have accessed the Display Properties Override for the "General Medium Detail" Display Property of this example Concrete Material Definition Style. I chose this Display Representation because this happens to be the one you will want to work with for those auto-generated 2D Sections and Elevations. Observe that this is where you can set things like Hatch Patterns, Colors, Linetypes and so forth.
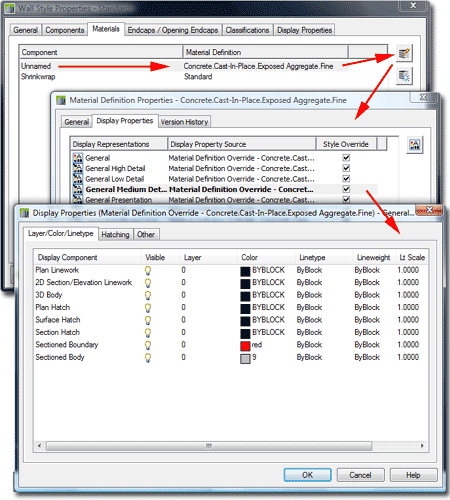
On the Other tab, illustrated right, you will find the place where the render-ready material is set inside the Material Definition Style. Render-ready materials are image files, a.k.a raster files, that typically come as .jpg, .gif, .png and .tga.
Make note of the fact that you can also set how you want the Surface Hatch to be placed across the surface of an Object. In many cases, for example, having a Surface Hatch Pattern, show up on the Back or Bottom sides only adds confusion to reading the Object.
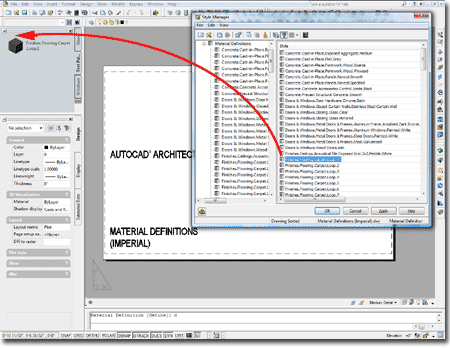
If you want to save yourself a bit of time when you need new Material Definition Styles, you can Open the "C:\Documents and Settings\All Users\Application Data\Autodesk\ADT 2008\enu\Styles\Imperial\Material Definitions (Imperial).dwg" file and access a long list of Material Definition Styles created by Autodesk.
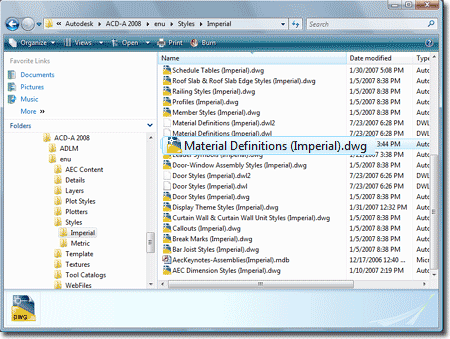
Illustrated to the right I show that I have Opened the "Material Definitions (Imperial).dwg" file, type "MaterialDefine" and have dragged one of the Material Definition Styles to a custom Tool Palette. When you take these steps, you create true Material Definition Styles that will save you a lot more time than importing those render-ready materials via the Content Browser.