These days product manufacturers need to be careful about what they send to my office because one of their products might just end up in an ARCHIdigm Kit. A while back I received a fairly impressive catalog on architectural products for gardens and I was particularly intrigued by the fencing systems because they seemed well suited for the Curtain Wall Object in Architectural Desktop. Though many architectural designers might ask "who cares" about something as simplistic as a lattice garden fence that most residential home owners will design and build on their own, I say that a little play can go a long way towards comprehending more complicated design problems. I believe that most ADT users will agree that when it comes to complexity in Object Styles, the Curtain Wall Style ranks number one. In the discussion below I hope that I can open the garden gate for those of you who don't enjoy playing/designing with the Curtain Wall Style.
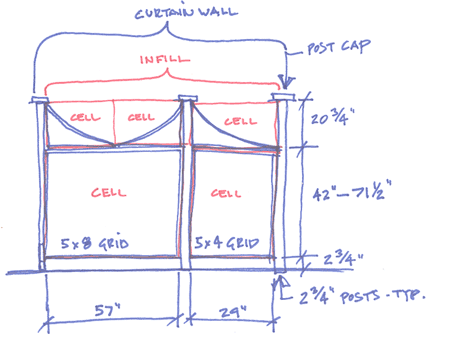
One of the most important things you can do before jumping into Curtain Wall Styles is to map out the structure; yea, that's right, use one of those pen or pencil things and draw on paper. For the lattice garden fence in this discussion I have decided that I want one that matches a catalog configuration which offers a vertical pattern based on one large and one small and a horizontal pattern where the top third offers a variety of lattice options ( a half moon swag, a quarter moon swag, regular swags or full lattice panels).
The first thing to do for a task like this is to make a sketch and then draw a logical breakdown of the parts. The second thing to do is figure out what Object Styles you may need to employ in order to create the individual parts. For many, this second part can really only be resolved by using several trial-n-error attempts because Curtain Wall Styles can be rather tricky and if you don't work with them every day, it's unlikely that you will know exactly what you can do (I am referring to Infills).
In the illustration to the right I show my sketch and the items I have identified as primary matters of concern. I need an asymmetrical pattern with grid patterns below and unique shapes above; and I need this pattern to repeat as part of a larger pattern. Below I will go through the steps I took to create a viable solution but be aware that you may be able to cook up other solutions that are just as good; perhaps even better.
Before I start explaining the work illustrated to the right let me emphasize that I have the benefit of having solved this problem before writing about it so the order of information and the choices I made did not come as easy as they appear here.
Though many ADT users are likely to focus on the Curtain Wall Style first (which is not a bad thing), logic would suggest that it makes more sense to first design the parts that make the whole. If you look at the smallest components of this example you will find that there are basically three of similar functionality and importance: a swag, a large lattice panel and a small lattice panel.
Though you could build the smallest components with a Door/Window Assembly Style, I have decided to start by creating custom Window Styles for a variety of reasons that include greater design flexibility later one and a correlation to how many create custom Curtain Walls for actual Curtain Wall use.
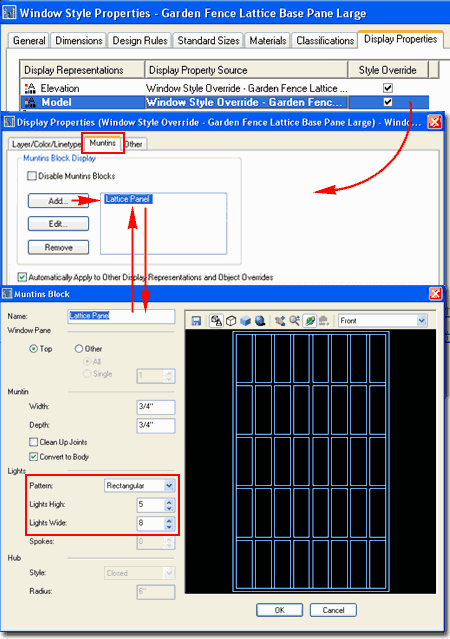
In the illustration to the right I show that I have created a New Window Style that I have named "Garden Fence Lattice Base Panel - Large". I set the Frame Width to 3/4" and the Depth to 1 1/2" and set the remaining values to 0". On the Display Properties tab, for Model and Elevation I used Style Overrides to Add Muntins as illustrated to the right. By looking at my catalog pictures, I figured out that the larger lattice panel should have 5 Lights High by 8 Lights Wide. I set the Width and Depth to 3/4" and used the "Convert to Body" option for the Model Display (this can eat up memory but looks cool).
I repeated the work discussed above for the smaller Lattice Panel and set its Muntin Lights to 5 Lights High by 4 Lights Wide. I named this Window Style as "Garden Fence Lattice Base Panel - Small".
To create the swag, which becomes a quarter of a "half moon" when flipped, I had to use a Polyline to draw a custom Profile shape. To make this work perfectly you will need to take some time to calculate the exact dimensions as they will come together in the final product. The more detailed the specifications in any catalog or on-line document, the easier this task becomes. From my catalog, I figured out that the swag needed to be 29" long and 20 3/4" high.
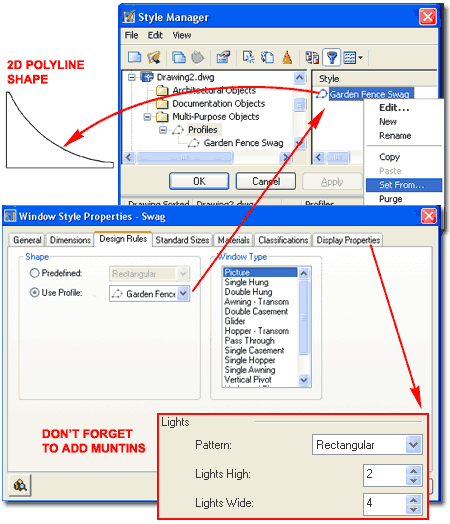
Illustrated to the right I show my Polyline swag shape and how I used the "Set From..." context menu option in the Style Manager (type "ProfileDefine") to capture it. I named this Profile "Garden Fence Swag".
The next step involves creating a Window Style, as discussed for the large and small lattice panels, using this new Profile. Illustrated to the right I show that I have created a New Window Style that I named "Swag". I used the same Dimension values as discussed above. On the Design Rules tab I used the "Use Profile" radio button to assign my "Garden Fence Swag" Profile as the Shape. The rest of the Window Style work is similar to that discussed above for the large and small lattice panels. For the swag, I found that setting its Muntins to 2 Lights High by 4 Lights Wide worked out to match the catalog description.
Once you have created a few custom Window Styles for your Curtain Wall Style, it's time to consider how the next phase of the design will work. If the overall pattern simply repeated along a perfect grid, then you could go directly to the Curtain Wall Style dialog but this pattern actually has another pattern within it.
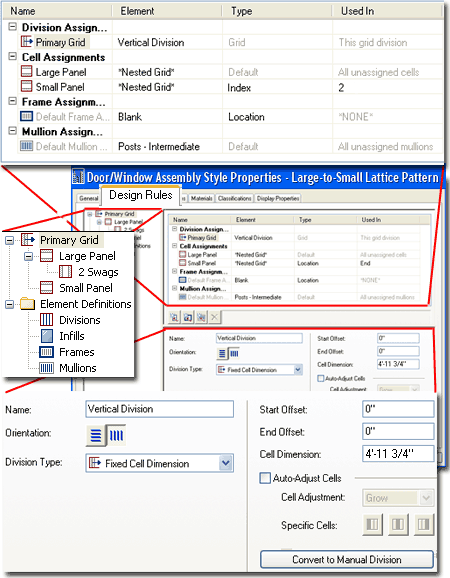
Illustrated to the right I show that I have chosen the Door/Window Assembly Style as the tool to create the asymmetrical or dash-dot pattern within the Curtain Wall Style. The reason I decided to use the Door/Window Assembly Style is actually rather simple; Curtain Wall Unit Styles do not allow for custom Infills and I need that option in order to use the Window Styles created above.
Primary Grid
As it turns out,
the Door/Window Assembly Style is really just a Curtain Wall that Anchors to
Wall Objects so the work that follows will be like placing a Curtain Wall
inside a Curtain Wall. To design this portion you will need to look
back to your sketch and think about how this grid will repeat within the
final grid (the Curtain Wall). For my Door/Window Assembly Style I
took the default Primary Grid and Divided it into Vertical Cells based on
the Dimension from one side (center of post to center of post - see 4'-11 3/4" Cell Dimension).
Defining two Divisions allows you to work with two Cells.
Cell Assignments
Under the Cell Assignments section, I show that I left the default set
to "Nested Grid" but Added another that I also set to "Nested Grid".
Notice that I changed the "Location" to "Index" for this
second "Nested Grid" and set the value to "2" so that the default
will be for the left (or 1st Index) side and the second one will be for the
right (or 2nd Index). Just to keep track of my work I renamed each of
these two Cell Assignments as "Large Panel" and "Small Panel";
i.e., I have a Nested Grid named "Large Panel" and another named "Small
Panel". I will return to this subject below.
Frame Assignments and Mullion
Assignments
Because the Window Styles provide the complete Frame with Muntins I don't
want more Frames. To remove the default Frame for the Primary Grid you
can simply set its Width and Depth to 0". I will, however, need an
intermediary Post for my Garden Fence so I set the default Mullion
Assignment to a New Mullion that I named "Posts - Intermediate" and set a
Width and Depth value of 2 3/4" (per the manufacturer's specifications).
Notice that I did not change the Default Mullion because I will set its
Width and Depth to 0" and use it as a Blank space later.
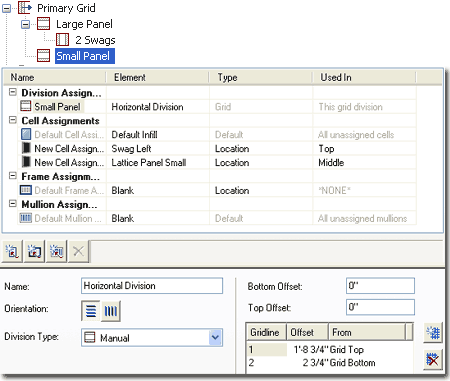
On the narrower side (Index 2) of my asymmetrical pattern I will need to account for the lower lattice panel and the swag at the top. If you look at the illustration to the right you will see that when I set the Primary Grid's Cell Assignment to Nested Grid, it created a "New Nested Grid" that I renamed to "Small Panel".
Under the "Small Panel" layout I used the default "Horizontal Division" but changed the Division Type to "Manual" so I could specify two horizontal Offset values for inserting my custom Window Styles (as Infills). The 2 3/4" Grid Bottom value relates to the manufacturer's specifications for how high the lattice panel sits above the finished grade and the 1'-8 3/4" Grid Top value relates to the manufacturer's specifications for the size of the swag. By setting "from bottom" and "from top" Offset values the middle remains adjustable.
Under Cell Assignments I used the Default Infill for "All unassigned cells" and set its "Panel Thickness" to 0". This Element will make the bottom 2 3/4" appear unfilled. For the 2nd Cell Assignment I set it to "New Infill..." and created a new custom Infill for the Window Style that acts as a swag (see discussion below under Infills). For this Element I set the Location to Top. For the 3rd Cell Assignment I set it to "New Infill..." and created a custom Infll for the Window Style that acts as a small lattice panel (see discussion below under Infills). For this Element I set the Location to Middle.
Under the Frame Assignments I set the Default Frame Assignment to use the same default Frame I used for the Primary Grid; if you recall, I set its Width and Depth to 0".
Under the Mullion Assignments I set the Default Mullion Assignment to use the default Mullion that I had previously set to a Width and Depth of 0".
On the broader side (Index 1) of my asymmetrical patter I will need to account for a similar lower panel and two swags on top. This layout is similar to that for the small lattice panel discussed above but because I want to use one swag in a double swag layout, I'll need to introduce yet another Nested Grid (see discussion below). If you look at the illustration to the right you will see that when I set the Primary Grid's second Cell Assignment to "Nested Grid", it created a "New Nested Grid" that I renamed to "Large Panel".
Under Division Assignments for the "Large Panel" layout I used the same "Horizontal Division" as for the "Small Panel".
Under Cell Assignments I used the Default Infill for "All unassigned cells". For the 3rd Cell Assignment I set it to "New Infill..." and created a custom Infll for the Window Style that acts as a large lattice panel (see discussion below under Infills). For this Element I set the Location to Middle. To create a divided grid for the Top Cell Assignment (each grid holding a swag), I added a New Cell Assignment and set it to "Nested Grid" which automatically creates a New Nested Grid that I renamed "2 Swags". I set the Location for this Cell Assignment to Top.
Under the Frame Assignments I set the Default Frame Assignment to use the same default Frame I used for the Primary Grid; if you recall, I set its Width and Depth to 0".
Under the Mullion Assignments I set the Default Mullion Assignment to use the default Mullion that I had previously set to a Width and Depth of 0".
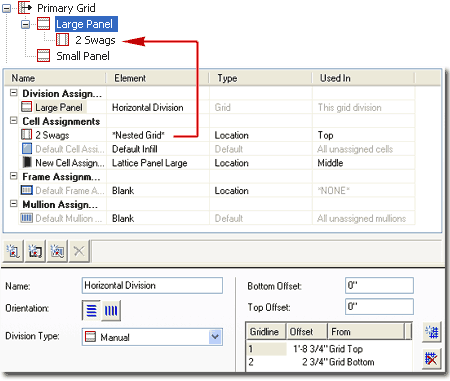
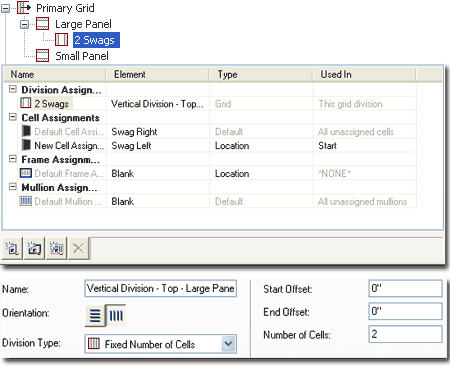
Continuing on the work discussed directly above, I show to the right that I have selected the "2 Swags" Nested Grid for the top portion of the Large Panel and configured it to use the same swag for each side.
To create the Vertical Division on the top portion of the Large Panel, I used the New Division option for the Division Assignment and created a simple Fixed Number of Cells Division Type with a number of 2 Cells. I renamed this Division to "Vertical Division - Top - Large Panel".
Under the Cell Assignments I set the Default Infill for "All unassigned cells" to a "New Infill..." and created a custom Infill for that uses the same Window Style that acts as a swag but I used the Flip X Default Orientation option to make it a mirrored Object (see discussion below under Infills). For the 2nd Cell Assignment I simply set the same "Swag Left" Assignment that I created and used for the small panel in a step discussed above. I set the Location for this Assignment to "Start".
Under the Frame Assignments I set the Default Frame Assignment to use the same default Frame I used for the Primary Grid; if you recall, I set its Width and Depth to 0".
Under the Mullion Assignments I set the Default Mullion Assignment to use the default Mullion that I had previously set to a Width and Depth of 0".
To me, the most interesting and valuable lesson in this exercise has to do with the use of Infills. When I get to the end of this discussion, you will see how Window Styles have become Infills in a Door/Window Assembly and how that Assembly has become an Infill in a Curtain Wall Style.
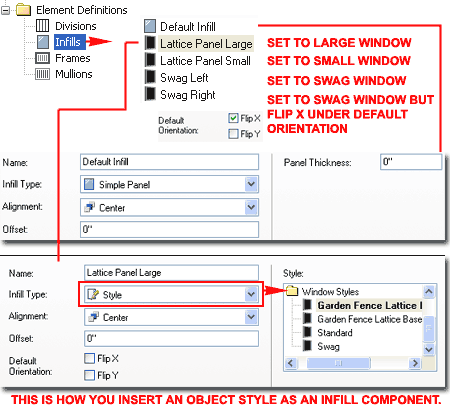
Illustrated to the right I show the Infill section under the Design Rules tab of the Door/Window Assembly Style discussed above. If you followed along with the steps outlined above you should already have some or all of the custom Infills because they are used as Cell Assignments under the Small Panel, Large Panel and 2 Swags Nested Grids.
As discussed above, the Default Infill should be set to a Panel Thickness of 0" so it can serve as an invisible clear space at the bottom of the garden fence. For the three Window Styles created earlier, create a New Infill and set the Infill Type to "Style"; this will allow you to Select Window Styles under the Styles pane as illustrated to the lower right.
For the Right Facing (mirrored) Swag, create a New Infill and set it as you have for the "Swag Left" but use the "Flip X" Default Orientation checkbox to mirror the Object.
The final phase for creating this garden fence style will be to create a custom Curtain Wall Style that uses the Door/Window Assembly Style (created above) as an Infill. This part is actually rather easy because the Door/Window Assembly Style has most of the detailed components in it.
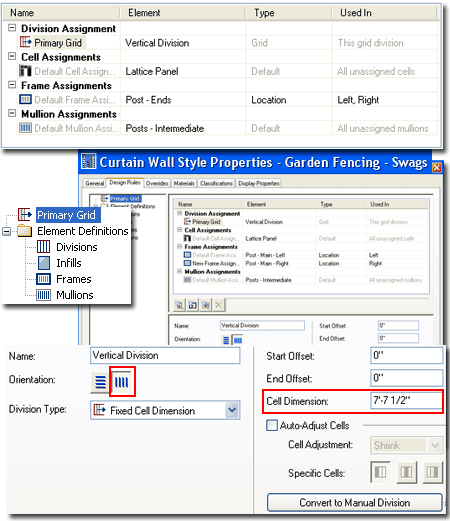
Illustrated to the right I show that I have created a new Curtain Wall Style that I have named "Garden Fencing - Swags". When you create a new Curtain Wall Style you automatically get a Primary Grid with a Cell Assignment that is set to a "Nested Grid" but because I only want a series of fence posts will Infills between, I don't need the second Grid. Notice that I set my Primary Grid to "Vertical Division" and used the Fixed Cell Dimension Type to set my post spacing. By referring back to the manufacturer's specifications, I figured out that the center-to-center spacing for the posts should be 7'-7 1/2" but I will have to make some adjustments to the first and last post positions (see discussion two cells down). To compensate for fences drawn longer or shorter than the manufacturer suggests, you could play with the Auto-Adjust Cells options for Shrinking or Growing. In my example I don't account for Shrinking or Growing because the reality of the matter is that this fence system only comes in very specific lengths.
For the one default Cell Assignment, notice that I have set it to a custom Infill that I have named "Lattice Panel". This Infill is actually the Door/Window Assembly Style created earlier - see discussion directly below for more on this subject.
For the Frame Assignments, notice that I have two custom Frames set to Locations for "Right" and Left". These will be the first and last Posts in the fence and because of how Curtain Walls work with respect to lengths, some "tweaking" was necessary - see discussion two cells down.
For the Mullion Assignment, notice that I simply renamed the default Mullion to "Posts - Intermediate" and set the Width and Depth values to 2 3/4". This Mullion will act as every-other post skipping for the posts introduced by the Door/Window Assembly Style. As far as the Curtain Wall Style is concerned, the Mullion acts as every post between the first and last.
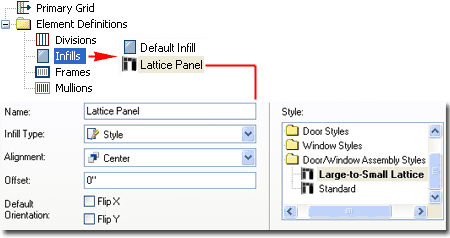
As discussed for the custom Infills under the Door/Window Assembly Style, for the Curtain Wall Style I show that I have created a new custom Infill that I have set to "Style" and Selected the Door/Window Assembly Style created earlier.
In this example both Frames and Mullions act as posts for the garden fence. When you draw Curtain Walls, the length is based on the far outside edges but when you draw fences you typically work with center-to-center dimensions.
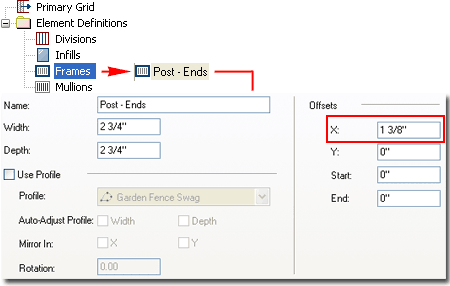
Illustrated to the right I show that I have renamed the default Frame to "Post - Ends" and set a Width and Depth value base on the manufacturer's specifications: 2 3/4" x 2 3/4". In order to offset the posts so they are spaced properly with the intermediate posts, I used an X direction Offset value of 1/2 * 2 3/4" = 1 3/8". This actually works for both ends. By the way, did you know that on Curtain Walls the direction of the Frames follows a circular path so that the top on one side is actually the bottom on the other side. You may have noticed this phenomenon when attempting to Add custom Blocks to the Ends of Frames.
Make sure you followed the instructions for the default Mullion (two cells up) which will act as intermediate posts.
This represents the sum total of the work for this exercise but you can easily continue with Display Representations, Materials and so on. You can also create other Window Styles for different Infill options.
If all your work has come together correctly you should be able to produce some rather nice looking garden fences. They may eat up a bit of memory as well.
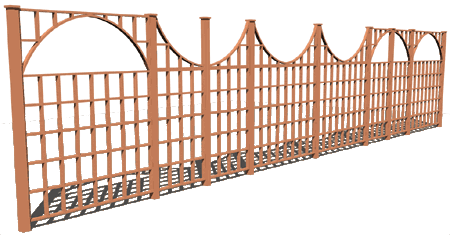
In the illustration to the right I show what my example garden fence looks like in 3D and in Elevation. The pattern undulates between a large panel and a small panel with two swags on top of the large panel but only one over the top of small panel.
Because the Swags were designed as Window Styles you should find that they offer the same Grips as regular Window Objects. This means that you can Flip Swags to change the design with such ease that it's actually quite fun.
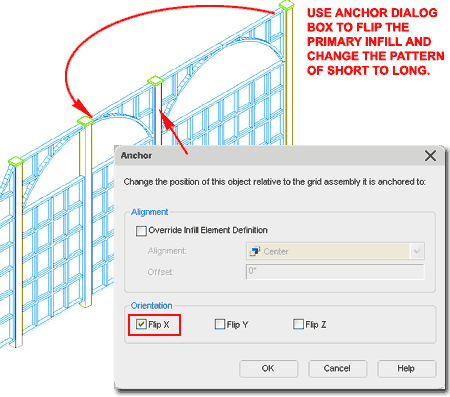
If you use the Anchor dialog, accessed from the Properties Palette, you can use the "Flip Z" checkbox to make half moons out of the swag pairs.
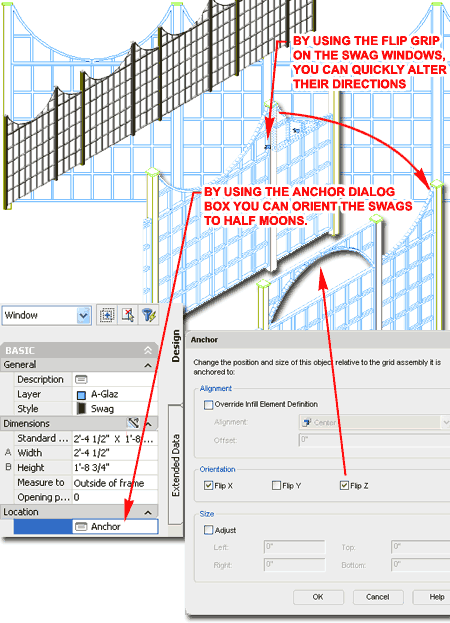
If you found that playing with Anchors on the Window Styles was fun, remember that the whole Curtain Wall Infill is a Door/Window Assembly and it too has Anchor options. You can Select this Object by picking one of the alternating intermediate posts.
Illustrated to the right I show that you can use a similar Anchor dialog, as discussed above, to really alter the garden fence design. You can make two small panels site side-by-side, for example. Heck, you could even put the swages on the bottom.
 Subscribers
to our Fences 5 eKit
may now download this garden fence style. The rest of you will have to
build it from scratch ;)
