First of all, one might ask why the heck I even bothered spending the time tinkering with AutoCAD 2009's Ribbon. The answer is that I am probably an idiot but since there were so few changes between AutoCAD Architecture 2008 and 2009, I thought I might look into creating some custom ACA Ribbons. For some reason, Autodesk did not see fit to give ACA users any Ribbons unique to ACA.
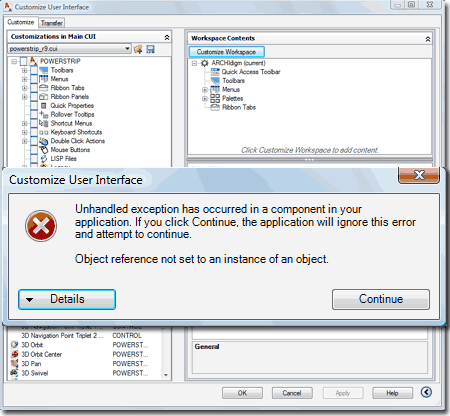
I have to admit that I hacked away at the Ribbon stuff in the Customize User Interface dialog for quite some time before I finally figured out some things that I should not do. In the illustration to the right I show the result of one thing I really should not have been doing.
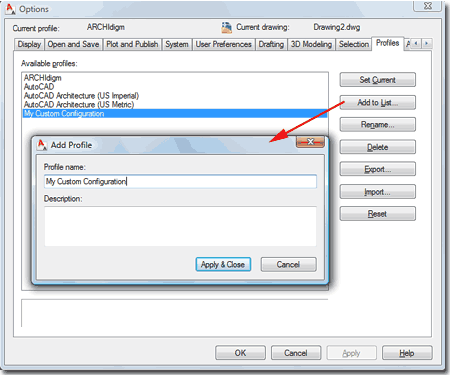
The first recommendation I have is to create a New Profile and set it Current. Profiles are now partly managed in XML files with the extension .aws and though the Options dialog does not offer settings for things like Ribbon Tabs, that information is stored with the Profile.aws file.
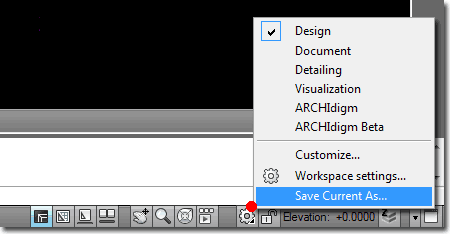
Use a custom Workspace
The second recommendation I have is to create a New Workspace (type "WorkSpace" or see image to the right) so you don't end up inadvertently modifying those that come with ACA. In this article I will use a custom Workspace, named "ARCHIdigm" as a means for connecting to a custom Ribbon Tab within a custom Partial CUI file.
If you plan to experiment with existing customization files for AutoCAD or ACA, I recommend that you make back up copies of all .cui files. You may also want to find the Profile.aws file for the current Profile (there's a folder with its name) and make a backup of that.
It's always a good idea to keep your customized work separate from OOTB items; especially since you are likely to get a new release next year.
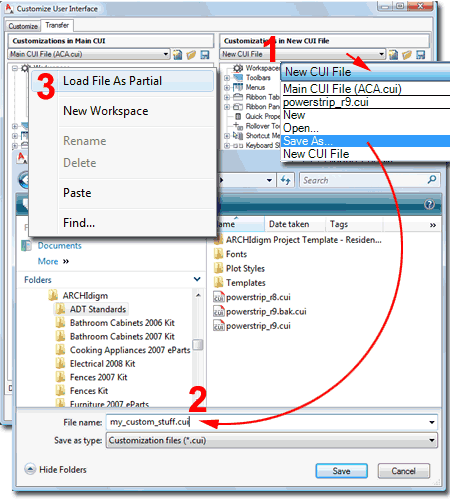
In the illustration to the right I show the basic steps for creating a New custom CUI and Loading it as a Partial CUI.
Under the Transfer tab of the Customize User Interface dialog, use the "Create a New Customization file" button and then the "Save the Customization File" button to locate and name your unique CUI.
After you have saved your custom CUI file, use the "Load File As Partial" context menu from the right-hand pane.
Now you have a completely unique custom CUI file that you can experiment with and not affect, hopefully, the default ACA CUI's.
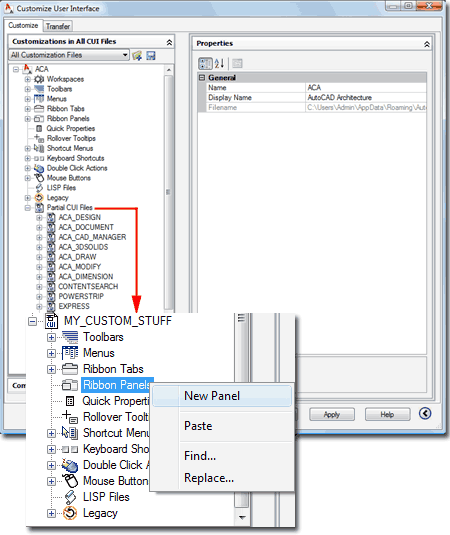
Under the Customize tab of the Customize User Interface dialog, you should now see your custom Partial CUI File listed under a category labeled "Partial CUI Files".
In the illustration to the right I show that I have high-lighted the "Ribbon Panels" category for my Partial CUI File and activated the context menu to create a New Panel. For the rest of this article my custom Ribbon Panel will be labeled as "Openings" for commands like "DoorAdd", "WindowAdd" and so forth.
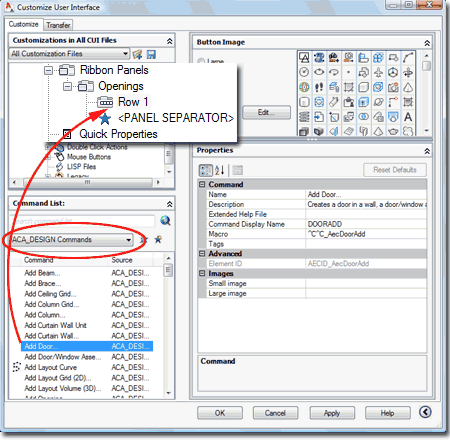
When you create a New Panel you automatically get a single Row and a Panel Separator. The Row is automatically named "Row 1". Whatever you do, don't drag Row 1 under the "Panel Separator" because it will drive you nuts when developing your first Ribbon Row.
In the illustration to the right I show that I have located the "Add Door..." command in the "ACA_Design" Commands list and dragged it up to Row 1. This is the easiest way to create a Ribbon Panel but you might want to create your own custom Commands to add to your Ribbon Panel. One reason for this is that most of the default ACA Commands lack image icons and if you add them to the stock Commands, they will appear in places like the pull-down menu; i.e., you end up modifying OOTB files.
Note:
Every time you
drag a tool up, the command list resets to all commands and you will have to
set it back to ACA_DESIGN Commands.
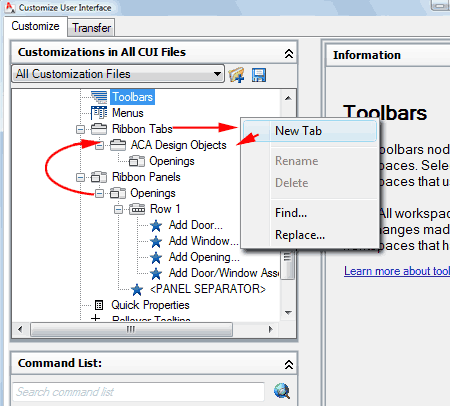
After you have added a few Commands to your Ribbon Panel, under Row 1, you will need to create a Ribbon Tab for the Panel to reside under.
In the illustration to the right I show that I have used the Ribbon Tabs context menu to create a New Tab that I named "ACA Design Objects". Then, I dragged my custom Ribbon Panel up to this new Ribbon Tab.
Once you have a custom Ribbon Tab with a custom Ribbon Panel, you can add the Tab to your custom Workspace. You could add it to any Workspace but I recommend that you do your best to keep all CUI development work separate from OOTB files because the probability for problems is quite high in my personal experience.
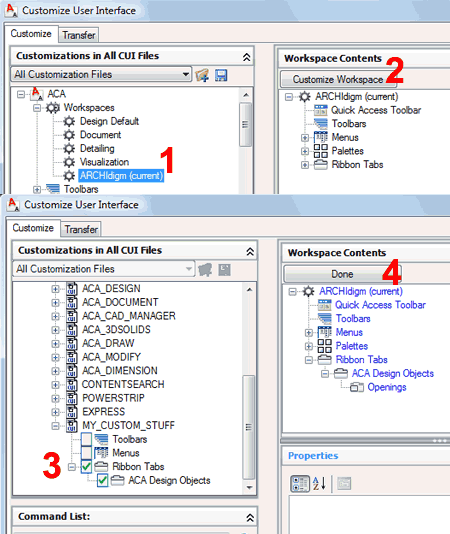
In the illustration to the right I show that I have a custom Workspace, named "ARCHIdigm", highlighted so that I can use the "Customize Workspace" button in the right-hand pane.
After selecting the "Customize Workspace" button, step 2, notice that I have scrolled down to the Partial CUI Files again and expanded my custom CUI File. Because I am in the middle of customizing a Workspace, the list of items is now short and only allows me to put checks in boxes for items I want to Add to my Workspace.
After checking the custom Ribbon Tab I created earlier, I show that it is displayed under the Workspace Contents section. For the final step, simply use the "Done" button.
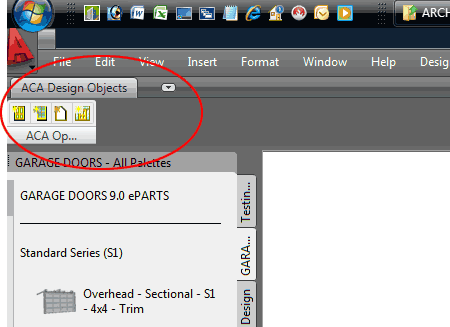
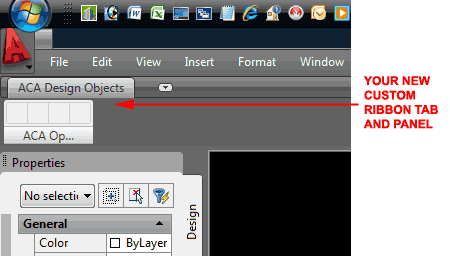
After all of the work outlined above, you should find that you have created a custom Ribbon Tab with a single Ribbon Panel as illustrated to the right.
The example Ribbon Panel illustrated here has no image icons because ACA doesn't come with any for "DoorAdd", "WindowAdd", and so forth. I'll do my best to help you out with the missing icons in the discussion below.
Oh, AutoCAD Architecture doesn't come with very many icons for Toolbars or Ribbons so you may need to create your own.
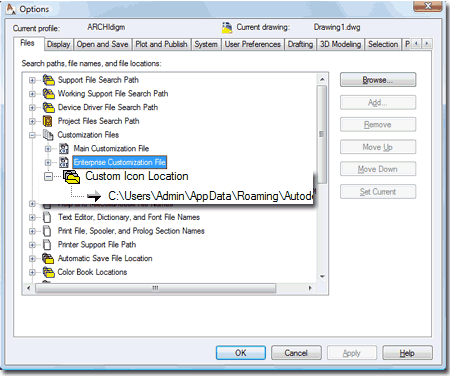
In the illustration to the right I show the "Custom Icon Location" path statement you can read and/or alter under the Files tab of the Options dialog. This statement is under the "Customization Files" category.
Though you can use the Browse button to set any path you prefer, I recommend that you simply take note of the path statement listed by default and use it to place any new icons. You probably won't have the time or patience to make all sorts of icons so I am providing a set I have collected since the days of ADT 3.3. This set is something of a mess with respect to names and redundancies but you should be able to find acceptable icons for a lot of tools you will want to put on your ACA Ribbon. I suspect we will see new icons in the next release of ACA.
Download ACA Icons -> adt_icons.zip
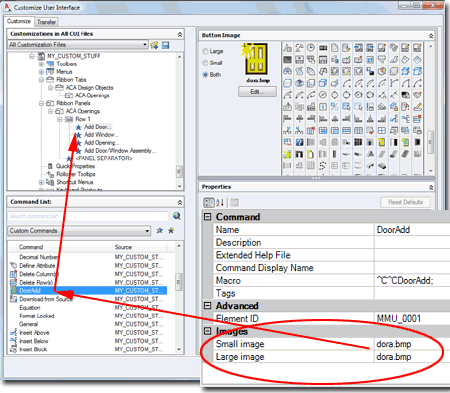
In the illustration to the right I show how you can use the Small image and Large image fields of your Custom Commands to Browse for an icon image. The ones I provided are in .bmp format.
Be aware that if you used Commands from the set provided with ACA, assigning an image will affect how that Command appears in stock ACA menus. For example, if you set the Door Add Image for the "Add Door" Command in ACA, you will see the new image on the Doors fly-out of the Design pull-down menu.
If you want to avoid altering any stock ACA menu items, be sure to create Custom Commands and then assign the images to those.
Note:
Among the numerous irritating things that I have encountered using the CUI
dialog to customize with, I have found that images don't always stick.
For best results, Browse for the image and then look for it under the Button
Image area where you can double pick on it to make sure you see it show up
for the Command highlighted to the lower left of this dialog.
In the illustration to the right I show the results of having created a custom Workspace under which I assigned a custom Ribbon from a custom Partial menu.