The use of custom Profile shapes in Architectural Desktop is one of the most effective options for creating custom Object Styles. They can be used in so many places that I can't rattle off the full list of places but in this article I will share some insights on the use of this tool.
Architectural Desktop categorizes Profiles as Definition Styles under the Multi-purpose Objects folder of the Style Manager but all you need to think of is Closed Polyline shapes. As the name suggests, a Profile is a cross-sectional outline of a three-dimensional form extruded along an axis. For most Objects in ADT, Profiles are employed to change the shape of basic primitive forms such as Doors, Windows, Frames, Mullions, Soffits, Wall Components and so on where the direction of extrusion is predetermined by the Object's Components. In other cases, like with Mass Elements, a Profile can be used to Extrude along or Revolved around the Z-axis of the UCS icon (though not always with the best Display Representation Results).
Though Profiles can only be created from Closed Polylines, you can use multiple Closed Polines (referred to as "Rings") and these rings can either be solid forms or "Voids". These options can, for example, be used to create results like multiple glazed panels in Doors or hollow tubes for Railings.
Beyond Profiles you will find tools that work on a similar principle such as those for Structural Members where the MemberShapeDefine command can be used to create a Profile for use under Structural Member Styles. Walls also have tools that are similar to Profiles but with unique requirements such as Body Modifiers and Endcap Styles which are created by using Polylines that one Edge open.
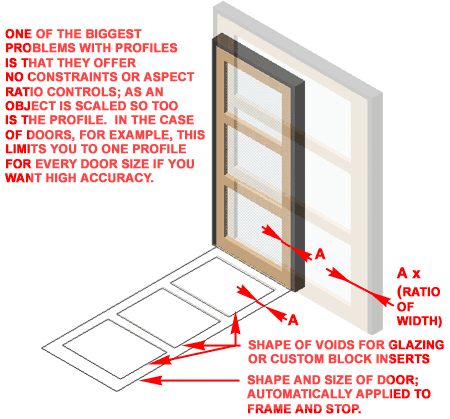
Illustrated to the right I show a simple example of how you can use a Profile Definition Style to create a custom Door Style. By using a rectangle for the door shape and internal rectangles for holes or "voids", the Door Style will automatically assign the Glass Component to these holes. To experiment with this process, follow the command line steps listed below.
Command: Profile
Profile [as Pline/Definitions]: D
On Style Manager Window, Create a New Style or Select
an Existing one, Right-Click and Select "Set From..."
- See illustration below right.
Select a closed polyline: <Select the outer rectangle for the door shape>
Add another ring? [Yes/No] <No>: <Type "Y" to create a hole or "N" to
finish>
Select a closed polyline: <Select an inner rectangle for a glazed panel>
Ring is a void area? [Yes/No] <Yes>: <Type "Y" to make a hole or "N" to
make another solid section>
Add another ring? [Yes/No] <No>: <Repeat the process of adding "rings"
until done>
Insertion Point or <Centroid>: <The default "centroid" is typically
sufficient>
Profile [as Pline/Definitions]: <hit the
Enter Key to exit>
Also illustrated to the right is one of the greatest problems with how the Profile Style is currently configured to work in ADT. Because it simply stores the exact Polyline Objects you select when during creation, relationships between multiple "rings" remain static much like how a Block behaves when Scaled. In the case of a Door Style, for example, the proportions of the main body are likely to remain constant while the "rings" would get larger or smaller depending on the width and height of the actual door. With Profiles, this is not possible and thus what you get is a direct linear scalar effect the makes it necessary to create a unique Profile for every Door Size if you want high accuracy.
Illustrated to the right is an example of what you may be able to produce with a Railing Style simply by using the default Component settings. The problem with using a Railing Style as a Trellis is that Railings were not designed to have unique left and right sides; in essence, much like the Curtain Wall Object Railings are somewhat two-dimensional offering a width but generally only working in the Z-axis or direction of Height.
In the discussion below I will use a Railing Style to demonstrate how you can employ Profile Definition Styles to add another dimension to Objects like Railings, Door/Window Assemblies and Curtain Walls.
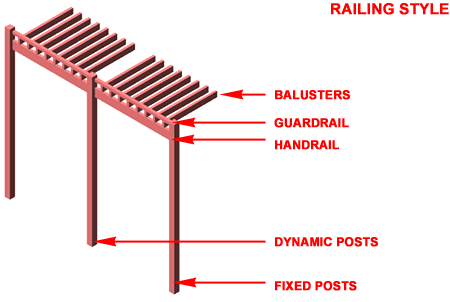
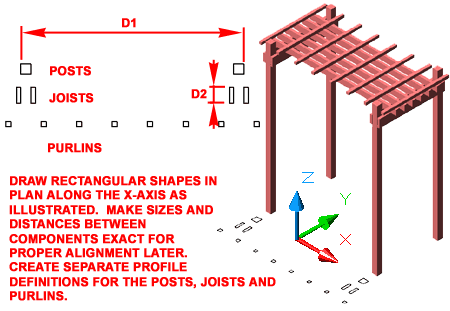
Illustrated to the right I show that I have used the "Rectang" command to create "profiles" of various members that I want to use in my Railing Style. As discussed above, Railing Styles do not offer the option to have a left post and a right post so I have drawn two posts to force the Railing Style into creating a right and left post out of one post.
I have also drawn four rectangles for my Joists that will be attached to either side of the posts. The distance between these joists must match the width and distance between the posts.
Just to add a little extra detailing, I have also drawn a bunch of small rectangles that I will use for the upper purlins and once again, the size and spacing must be drawn accurately relative to the posts and joists.
Be sure to keep track of the outer distance between each of these components because you will need to input this distance later for best results.
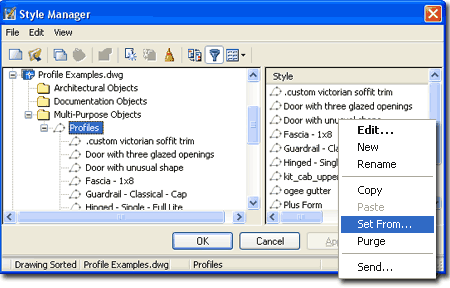
Once you have drawn the various rectangles as discussed above, you will need to use the "Profile" or "ProfileDefine" command to activate the Style Manager as illustrated to the right. In the Style Manager Window, use the "New Style" button or context menu to create New Profile Definition Names for each set of components; i.e., one for the posts, one for the joists and one for the purlins.
After creating a Profile Definition Name, highlight the Style, right-click and use the Set from... option on the Context menu. This action will defer to the command line where you can follow the steps listed below:
Command Line:
Command: ProfileDefine
<use Set From option in the Style Manager Window>
Select a closed polyline:<Select first rectangle>
Add another ring? [Yes/No] <No>: Y
Select a closed polyline:<Select second rectangle>
Ring is a void area? [Yes/No] <Yes>: N
Add another ring? [Yes/No] <No>: <use default of "No" when done,
otherwise repeat previous two steps as many times as required>
Insertion Point or <Centroid>:
Command:
By making each "Ring" a solid instead of a "Void", Architectural Desktop will attempt to produce a three-dimensional form as long as no edges are shared; i.e., there has to be some amount of distance between the rectangles.
Once you have completed the task of creating the Profile Definitions, it's time to create a Railing Style that will take advantage of them.
 Illustrated
to the right I show that I have create a New Railing Style that I
have named "Trellis 1" and that I have made several design decisions
on the Railing Locations tab.
Illustrated
to the right I show that I have create a New Railing Style that I
have named "Trellis 1" and that I have made several design decisions
on the Railing Locations tab.
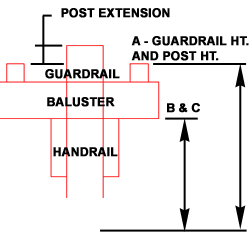
Because Railing Styles have been designed to produce railings and not fences or a trellis, a bit of trickery has to be employed to get trellis-like results. The Guardrail Height can be used to set the height of the Posts and controls the top position for the Balusters. In this example I will be using the Purlins Profile Definition for the Guardrail Component and have set the top of the Purlins to 8'-0". The Handrail Height is a free component that can be set to any height you want but since I plan to use it for the main structural joists by using the Joists Profile Definition, I will set a Height for the top of the joists; in this example I show this value as 7'-8 1/2" which allows for 3 1/2" for perpendicular joists above but under the Purlins.
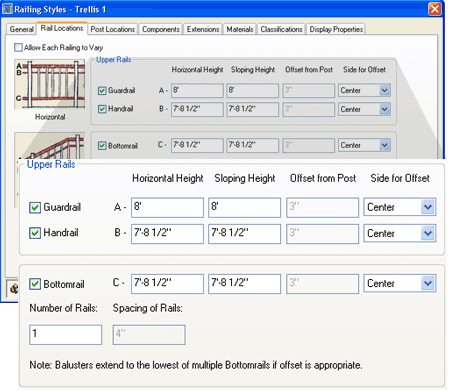
The Bottomrail Height controls the bottom position of the Balusters while the Guardrail controls the top position. These two Heights can thus be used to set the Width of the Balusters which I plan to use as joists. In this example I show that I have set the Bottomrail Height equal to the Handrail Height so my Balusters will span between the Guardrail Height and the Bottomrail: 3 1/2"
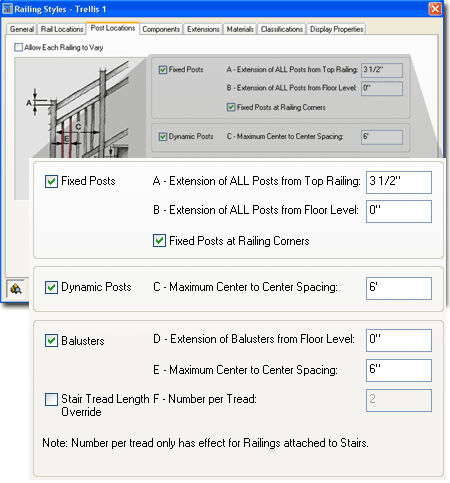
On the Post Locations tab I show that I have decided to push the Posts up past the Guardrail Height by 3 1/2" which is quite common for Trellis Posts. I also show that I have set the "Fixed Posts at Railing Corners" option even though I find that you really can't use this Style to draw articulated Trellis designs; better to draw each linear section as separate Objects.
By using the "Dynamic Posts" setting, I can set the maximum distance I would like my Trellis Posts to be spaced.
For the Balusters, as discussed above, I plan to use this component as a second layer of joists going perpendicular to the main structural joists. These could also be thought of as purlins if your Trellis design only has one layer of perpendicular members. In my example I plan to use 4x4 members and thus spaced them 6" apart which may prove to be a bit too close but I can always come back and change any of these values.
On the Components tab of the Railing Styles dialog box we get to employ those Profile Definitions created earlier and thus this is the heart of the trick.
For the Guardrail Component I show that I have set the Profile Name to the one I created for the Purlins. To use the exact dimensions of the rectangles in the Profile Definition, I set the Scale to "No Scale" which automatically sets and locks the Width and Depth values. For the Justification, I used "Bottom Center" option so the Purlins will sit on top of the Guardrail Height set on the Rail Locations tab.
For the Handrail Component I show that I have set the Profile Name to the one I created for the main structural Joists.
For the Bottomrail Component I set the Width and Depth to 0" because I am not using this Component.
For the Fixed and Dynamic Post Components I show that I have set the Profile Name to the one I created for the Posts. Though the Posts were actually drawn as 6'-0" center-to-center, the Profile's Width reads as 6'-3 1/2" because that is the full out-to-out Width.
For the Baluster Component I show that I have set the Profile Name to "*rectangular*" which is a default option that allows you to set Width and Depth values. This Component will act as the second layer of joists perpendicular to the main structural joists and thus I can use the Width value to control how long I want these joists. Since I want some overhang, I have set them to 7'-2".
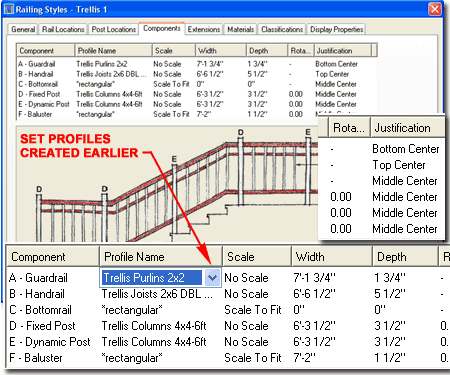
For the Depth value, I show that I have specified 1 1/2" which will actually appear as the member width. If you recall, the Height of this Component is controlled by the distance between the Guardrail Height and the Bottomrail Height and in this example that equates to 3 1/2". The result is a 2x4 that is 7'-2" long.
In the discussion above I only used the "No Scale" option for Scale but you can use the "Scale To Fit Width", "Scale To Fit Depth" or "Scale To Fit" options as well. The problem with scaling with the Width is that it affects the overall distance between multiple Rectangles in the Profiles as well as the Width of the Rectangles in the Profile. Of the group, you may find that the "Scale To Fit Depth" works rather well for Components such as the Joists ( used for Handrails ) because that allows you to set different Depth or member height values while keeping the Width locked to the original value - see example in illustration to the right.

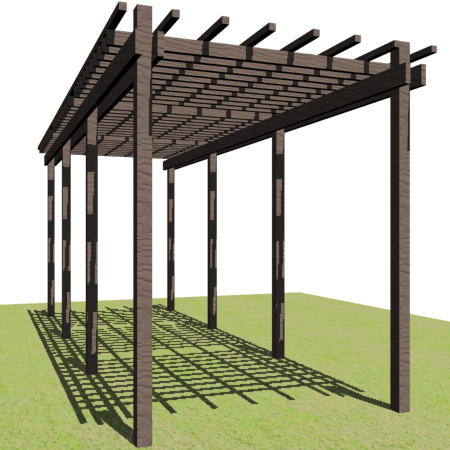
Testing the results of the Trellis Railing Style
Once you have completed all of the work setting Heights, Center to Center Spacing and Profile Names, use the RailingAdd command and see what your new Railing Style will create.
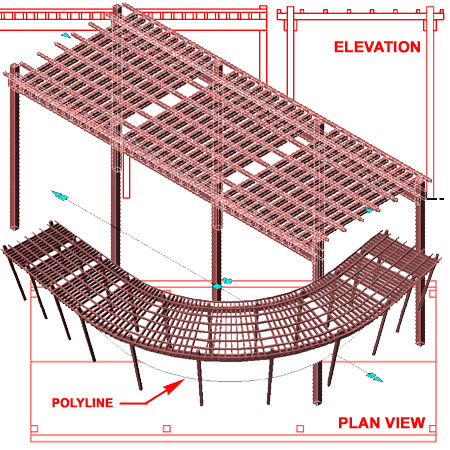
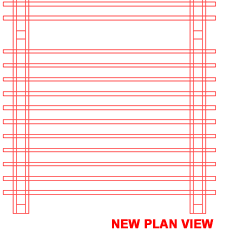
In the illustration to the right I show the Front, Side, Plan and Isometric Views of a simple straight Trellis as it should look based on the work discussed above. I also show how you can use a Polyline as a source for "RailingConvert". This option works fairly well with large curves but not with sharp angles.
You should find that this work produces acceptable results for Presentation drawings, Elevations and Sections but rather disappointing results for Plans. The problem with the Plan View is that Railing Styles have a built-in display representation for Plan with no option to control the cutting plane - keep in mind railing are meant to run along a sloped Stair. In the final part of this article I will discuss two different options for creating a more acceptable Plan Display Representation.
As discussed above, the Plan Display Representations for this example Trellis Railing Style do not show the type of detail most architects prefer. For the first option to remedy this display issue, you can employ the same technique of working with Profiles as employed to create the Component Profiles above.
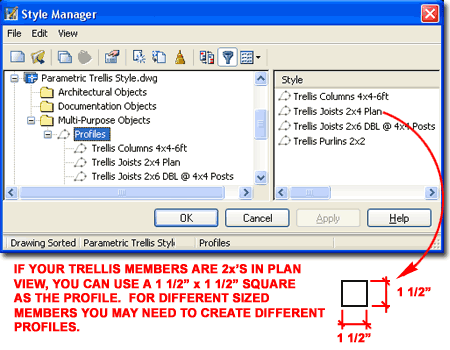
Illustrated to the right I show that I have used the "ProfileDefine" command once again and create a New Profile Definition Style that I named "Trellis Joists 2x4 Plan". For this Profile I used a simple square created with the "Rectang" command and because all of my members are based on 2x's, I made the rectangle 1 1/2" x 1 1/2". Below I will discuss how this rectangle can be scaled to match the required length or Width as set on the Components tab or the Railing Style Properties dialog.
Note:
If you happen to need two sizes for the Plan View members, you can draw one
side for one width and the other side for the second width; i.e., a
rectangular shape as opposed to a square. See comments under
Other tab - Custom Profile - for different
Components for more on this trick.
By returning to the Railing Styles dialog you can access the various Plan Display Representations under the Display Properties tab.
In the illustration to the right I show that I have set a Style Override for the "Plan High Detail" Display Representation. A Style Override is the most logical approach because this is a highly unique Railing Style that is not being used as a Railing. Notice also that I have set Style Overrides for all of the Display Representations.
On the Layer/Color/Linetype tab of the Display Properties dialog for the "Plan High Detail" Style Override, I show that I really only need two of the Display Components: Post up and Handrail up. For this example I have decided not to use the Guardrail Display Component simply because it may prove to create too much linework but this should not deter you from using it if you wish.
Notice that there is no Display Component for Balusters but that won't stop me from using this Component in Plan View - see discussion below.
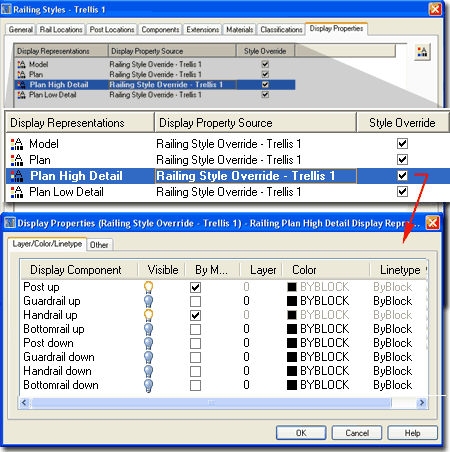
On the Other tab of the Display Properties dialog box, illustrated right, I show that I have used the Add... button to access the Custom Profile dialog box where I have added the Profile Definition created earlier for each Component that I want to display in this "Plan High Detail" Style Override.
In the illustration to the right I show that I have used the Custom Profile dialog box to set the Plan View based Profile Definition to "Replace" the "Baluster" Component. By using the "Depth" and "Width" Scale To Fit options, the Profile will scale to match the values set for the Baluster Component under the Components tab of the Railing Style Properties dialog. If you recall, the Baluster Component was used to create the second joists.

 For
the structural joists I had to Add... the same Profile Definition four
times, one for joist even though I used one Profile Definition for this
Component on the Components tab. A custom Plan View Profile Definition
Style could have been created to draw all four of the structural joists but
that would mean more work and may prove to be less flexible for future
design changes.
For
the structural joists I had to Add... the same Profile Definition four
times, one for joist even though I used one Profile Definition for this
Component on the Components tab. A custom Plan View Profile Definition
Style could have been created to draw all four of the structural joists but
that would mean more work and may prove to be less flexible for future
design changes.
In the illustration to the right I show that I set the Profile Definition to "Replace" the "Handrail" Component. I used the "Width" Scale To Fit option in order to stretch the Profile to the full length of the Trellis; i.e., the Width actually serves as the length. You will not be able to use the "Depth" option because of how the Component is read as being as deep as the full width of the Trellis.
Note:
Illustrated to the right I show how you can use the Rotate "Z" value
field to change which side of the Profile is Scaled to match the "Width".
This option is particularly great if you are using one Profile with sides
that have two different lengths as discussed above under
Creating a Plan
View Profile Definition Style.

The Insertion Point and Insertion Offset value fields need to be set to unique values for all four Joists in order to match the position required to align with both sides of both posts. To get the right values for the Insertion Offset, I recommend that you simply use the "Y" Front Insertion Point, check the results and use the Distance command to figure out how much to Offset by. Remember that you can use negative numbers to Offset in the opposite direction. You could also allow the "Y "Insertion Point to be set to Center and calculate the distance out from there if you prefer.
Though the solution discussed above provides all of the linework you may expect to see in Plan View, it doesn't clean any of the intersections and that may not be acceptable.
 Illustrated
to the right I show another option that you can employ to produce a more
desirable Plan View Display Representation. Start by using the
MassGroup command, specify the Add option on the command line, Select your
Trellis and place the Mass Group icon.
Illustrated
to the right I show another option that you can employ to produce a more
desirable Plan View Display Representation. Start by using the
MassGroup command, specify the Add option on the command line, Select your
Trellis and place the Mass Group icon.
Once you have Added the Trellis to a Mass Group, the Object will actually be enveloped by a new Object that has its own Display Properties. You can think of this a giant Shrinkwrap effect which is not a great option if you want to show different Components with different Material Definitions.
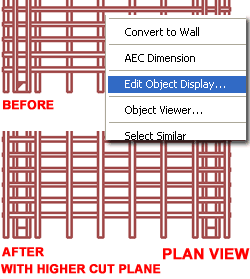
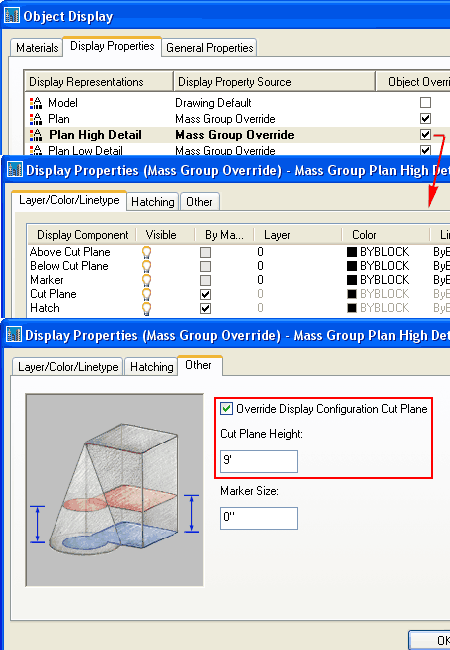
Select the Mass Group, right-click and Select "Edit Object Display..." from the Context menu as illustrated above. On the Object Display dialog box, go to the Display Properties tab and use the "Object Override" option for any of the Display Representations that you wish to change. In this example I show that I have used a Display Override on the "Plan High Detail" Display Representation and accessed the Display Properties dialog where you can see that a Mass Group has several unique Display Components but the most important setting is on the Other tab.
On the Other tab of the Display Properties dialog, use the "Cut Plane Height" value field to set a height completely above the Trellis and check the results.
Note:
Notice that the Object Display dialog offers a Materials tab where
you can assign a Material Definition to the Mass Group.
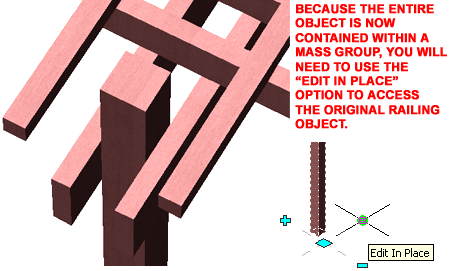
In case you are not familiar with Mass Groups, look for the "Edit In Place" marker after Selecting your Trellis. Because the Mass Group shrinkwraps the Railing Style, you have to use the "Edit In Place" methodology to access the actual Railing Style inside the Mass Group. Despite how complex or difficult this may sound, it is actually rather easy to work with.