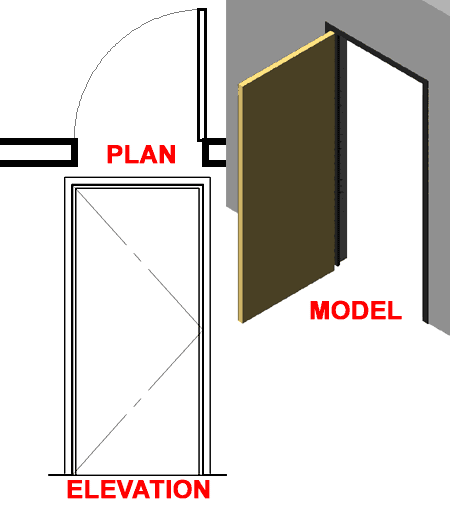
Illustrated to the right I show a sample image of some common Display Representations of a Door in a Wall that many architects consider standard ( particularly in residential work ). Though Architectural Desktop has Display Representations with the option to turn key components on or off in different Views, there are some surprising limitations to the system and that's where user creativity comes in.
The tip discussed below comes from an ARCHIdigm subscriber: Rob Cardin of Glass Architects in Santa Rosa California - thanks.
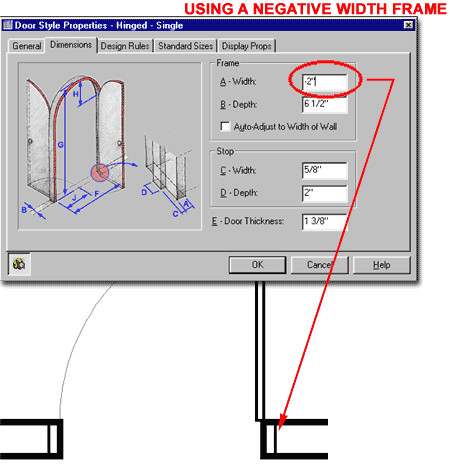
Illustrated to the right I show that I have changed the Frame Width of the default Hinged - Single Door Style from 2" to - 2" and thus pushed the frame into the Wall.
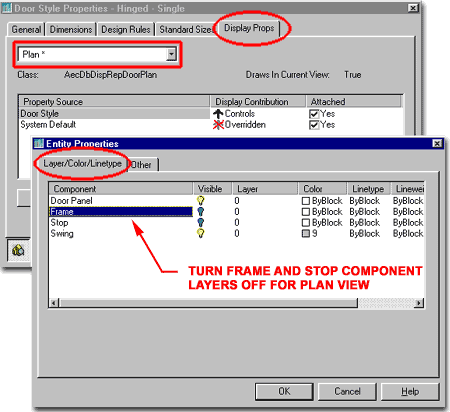
Illustrated to the right I show that I have Attached an Override for the Plan View of the Door Style and Turned the Frame and Stop components OFF on the Layer/Color/Linetype tab of the Entity Properties dialog box. By doing this, the negative frame and the door stops will not show up on Plan but will show up in Elevation Views and Model or 3D Views.
If you follow these instructions, you will get the same results as those illustrated in the top image. Using a Negative Frame Dimension does not affect the Schedule Data so a 3'-0" door, for example, will be reported as a 3'-0" door.
Chad Ames of Autodesk reminded me of the following - thanks:
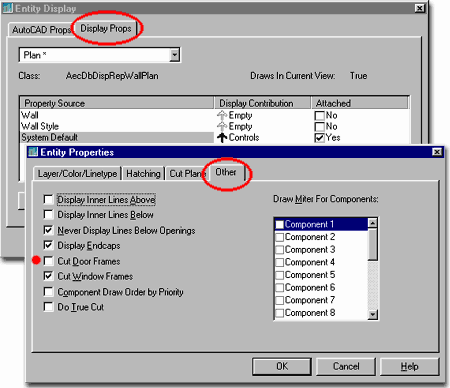
Illustrated to the right is another option for achieving a similar result. By using the Display Props of one or more Wall Styles, you can uncheck the Cut Door Frames and/or Cut Window Frames checkboxes on the Other tab. If you do this via the System Default Property Source, it should take care of most of your Walls as long as they don't have Overrides.
Since this is a display option and not a physical dimensional setting on a door, this method will either be more work because you have to confirm that the setting has been set correctly for all Plan Display Representations or this method will offer greater possibilities for this same reason. In other words, by using this method you could have one Plan View with the Frames gone and one where the true cut is shown correctly.
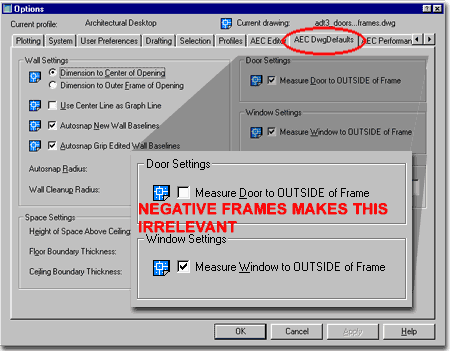
Unlike the negative door frame width option, using the Wall Display Props will continue to respect the Door Settings setting on the AEC DwgDefaults tab of the Options dialog box - see below.
Illustrated to the right I show the Options dialog box for Architectural Desktop and the AEC DwgDefault tab where users have the option to control how Door and Window sizes are determined relative to rough openings in Walls. If you use a Negative Frame Width on Doors or Windows, the option to "Measure ... to OUTSIDE of Frame" will not work and thus the measurement will always be to the inside. This should be okay for most Residential Architects on Doors but not on Windows. The best news is that the Schedules are not affected so if you specify a 3'-0" Door, the door will be reported in the schedule as a 3'-0" door regardless of the Negative Frame setting. The same is true for Windows should you venture down this same path with Window Styles.
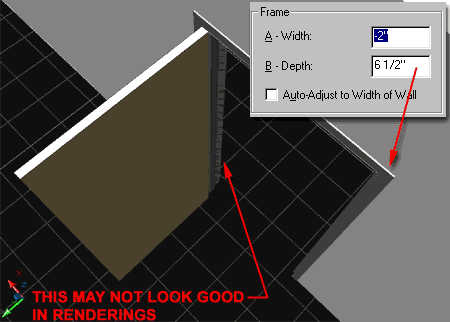
Illustrated to the right I show a 3D Perspective shot of the Door Style and how you can secure a good looking frame on the interior and exterior of the Door by making sure that the Frame Depth is greater than the Width of the Wall. Since the Jamb is actually inside the Wall, however, there will be some graphic problems in Shaded Views and in Renderings along the stop but it's not too bad.
