There are a few occasions where I find that I don't actually want to Tag my Doors and Windows with Number Bubbles and go through the trouble of creating a Schedule: on early schematic drawings and on tiny residential remodels.
For this discussion I will go through the steps required to create your own custom AEC Dimension Labels for Doors and Windows but you can expand on this information for Labeling Openings and Stairs.
The reason you may want to know about these Labels is that they are pretty easy to create and modify, they don't introduce or even use Property Set Data and they automatically Anchor to the Objects.
AEC Dimension Labels popped up somewhere around ADT 3 or 3.3 but access to these tools disappeared in ADT 4 and have yet to return in 5. Despite the lack of reference to these tools in any menu, you can still type the four AEC Dimension Label commands: DoorLabelAdd, WindowLabelAdd, OpeningLabelAdd and StairLabelAdd.
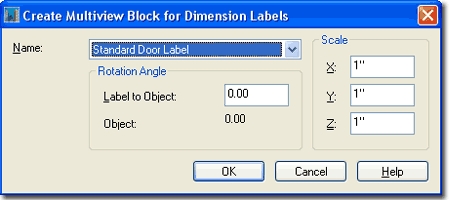
Illustrated to the right I show the dialog you will activated when using any of the four commands mentioned above.
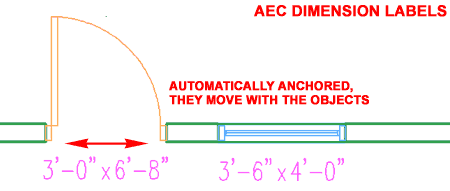
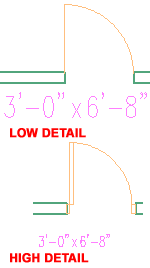
If, for example, you type "DoorLabelAdd" and test this tool out on one of your Door Objects, you are likely to see results similar to those illustrated to the right. The various Labels are hard-coded to produce basic results that you can either modify or use as a reference for creating your own Labels.
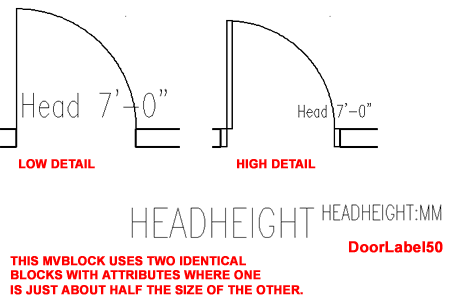
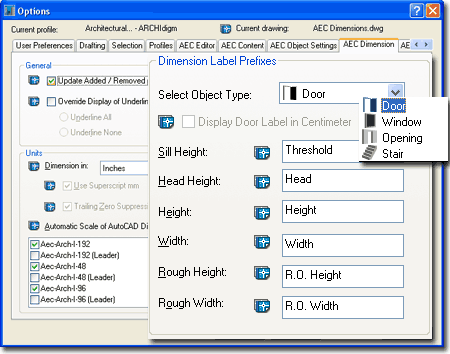
Each Label automatically generates a Text Style (Standard Label), an MvBlock with corresponding High and Low Detail Blocks, utilizes the current Dimension Style for Formatting and is assigned Prefixes by the AEC Dimension tab of the Options dialog box.
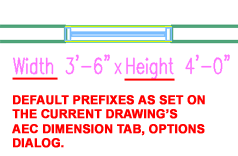
For me, the default report of Head Height on Doors is not really very useful and thus I looked for a way to change this to Width and Height instead.
As with all MvBlocks, you first need to create the Blocks that go into the MvBlock. Illustrated to the right I show some of the things you might want to take into consideration when creating your own Label Blocks for Doors, Windows or Openings.
Using the "AttDef" command I created an Attribute for the Door Width by using the Tag "WIDTH". This term is directly tied to the Object and was derived from the list of available terms found on the Options dialog ( see below). You cannot use a Default Value on these attributes so be sure to leave that field blank. Since I want to create a Label that has the Width of the Door followed by the Height, I set the Width text to Left Justified and the Height text to Right Justified. I also added a lower case "x" between these two attributes just for clarity.
You can use any Text Style you wish for these Attributes but just consider how you want to deal with that text at a later date. Since these are not Tags, they won't use the current Text Style when you use "Standard". I just decided to use the default "Standard Label" Text Style Name that the default Labels use.
The Height of the Text can be problematic because these Objects don't automatically Scale to the drawing Scale (it's actually controlled by a Registry Key). What I decided to do was to create two versions that match the Print Scales I regularly use: 1:48 and 1:96. As such I used 6" text for the 1:48 scale and 12" text for the 1:96 scale. You can use 4" and 8" if you prefer smaller Labels for these scales but I wouldn't go any smaller.
For the Blocks Names, use something that is easy to interpret at a later stage in this process and use a Base Point right in the middle of the "x".

If you have already inserted the default Door and/or Window Labels, you will find that you have a "Standard Door Label" and a "Standard Window Label" Multi-View Block.
 Illustrated
to the right I show two possible approaches you may take to create your own
custom MvBlocks for Door and Window Labels. You can create your own
custom MvBlock Name or use the default MvBlock Name. The advantage of
modifying the existing MvBlock Name is that the "Create Multiview Block for
Dimension Labels" dialog always defaults to the "Standard ..." MvBlock Names
and thus if you modify those names, it's just a little faster to use them.
Illustrated
to the right I show two possible approaches you may take to create your own
custom MvBlocks for Door and Window Labels. You can create your own
custom MvBlock Name or use the default MvBlock Name. The advantage of
modifying the existing MvBlock Name is that the "Create Multiview Block for
Dimension Labels" dialog always defaults to the "Standard ..." MvBlock Names
and thus if you modify those names, it's just a little faster to use them.
Also illustrated to the right I show the process of modifying the existing default "Standard Door Label" MvBlock Definition Properties. You will most likely want to have your custom Blocks display under Plan, Plan High Detail or Plan Low Detail and you can simply Remove any existing reference and replace them with the Add... button. If you created Blocks for different Scales, you will most likely want to match the Blocks with the Display Representations; i.e., large Block for Plan Low Detail and smaller Block for Plan High Detail.

Earlier in this discussion I made a reference to where I acquired the Attribute Tags ( Width and Height ); it is the same place where the Prefixes are set. On the AEC Dimension tab of the Options dialog you will find the Dimension Label Prefixes section where you will find a whole set of Prefixes for each of the four Object Types: Door, Window, Opening and Stair.
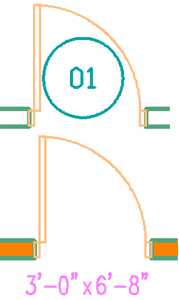
 When
you first use your custom Door or Window Label, you may find that it has
terms like Width and Height as illustrated to the left. If you prefer
not to have these prefixes there, simply go to the Options dialog and remove
the terms from the list.
When
you first use your custom Door or Window Label, you may find that it has
terms like Width and Height as illustrated to the left. If you prefer
not to have these prefixes there, simply go to the Options dialog and remove
the terms from the list.
Note:
Notice that all of the Prefixes are designed for the current drawing only; this means that you will need to make any changes you desire in your
Template Files.
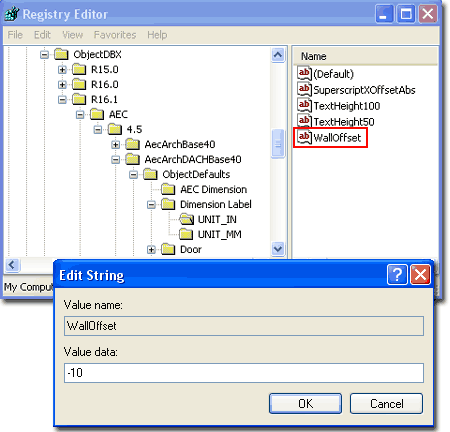
Are you frightened by the sight of the System Registry Editor dialog?
Illustrated to the right I show the
Registry Key that you can modify to control the amount of Offset
the AEC Dimension Labels use for Metric or Imperial Unit drawings.
Notice that I have used a value of (-10) which equates to negative 10
 units
or 10 inches as measured from the hinge side of Doors; e.g., you can use a
positive number to Offset the Label to the opposite side of the Object.
units
or 10 inches as measured from the hinge side of Doors; e.g., you can use a
positive number to Offset the Label to the opposite side of the Object.
\HKEY_CURRENT_USER\SOFTWARE\Autodesk\
ObjectDBX\R16.1\AEC\4.5\AecArchDACHBase40\ObjectDefaults\Dimension Label
Illustrated to the left I show that by playing around with the Display Representations of Tags and Labels you can create some Display Configurations that alternate between Labels and Tags depending on the type of drawing you want to present.