Back in Architectural Desktop 3.3 the default Door Schedule displayed the Door Sizes just the way I liked them. Instead of displaying the full Width of double doors, the Door Schedule labeled them with a "PR" followed by the Width of a single Door. Unless I am going to provide rough opening sizes, the full Width is a bit nonsensical because what I am really calling out is the nominal door size.
Okay, so we can get into a debate about this subject but that's really not the point of this article. In fact, I am not even upset about how the ADT team changed the default Door Schedule to display the full opening Width. What I am upset about is what I discovered when I wanted to correct this problem for a client and then try to explain it.
Below, I outline the steps I took to make this old format work in the new default Door Schedule. See if you can spot the Description field that I assumed stated something about the results I wanted but didn't get and how that sure ate up some valuable time. It may be amusing now but it wasn't in the heat of the moment.

Be sure to test the following steps in a sample drawing file before doing this to any important files or to your template files. Do I really have to state that?
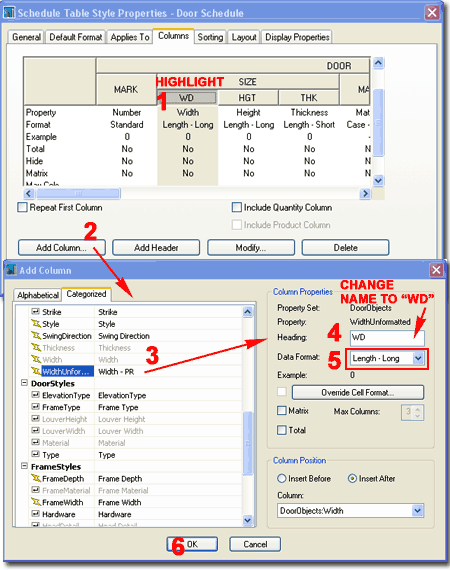
Illustrated to the right I show the Schedule Table Style Properties dialog that you can access in a number of ways; the easiest is via the Context menu from an existing Door Schedule Object. From the Columns tab, highlight the ( 1 ) WD column as indicated. Use the ( 2 ) Add Column... button to access the Add Column dialog where you should find the ( 3 ) "WidthUnformatted" Automatic Property Data. Select this item and notice how the Heading name is automatically set to "Width - PR". I suggest changing this ( 4 ) Header to "WD" so it can be used to replace the existing "WD" column in the Door Schedule.
Set the ( 5 ) Data Format to "Length - Long" if you prefer to have your Width stated in Feet and Inches.
You can review the Column Position to see that this new Column will be Inserted After the Column we highlighted back on the Schedule Table Style Properties dialog.
Illustrated to the right I continue the steps from the previous cell by showing how you can now use the ( 8 ) Delete button to remove the original "WD" Column. Notice that you now have a new "WD" Column.
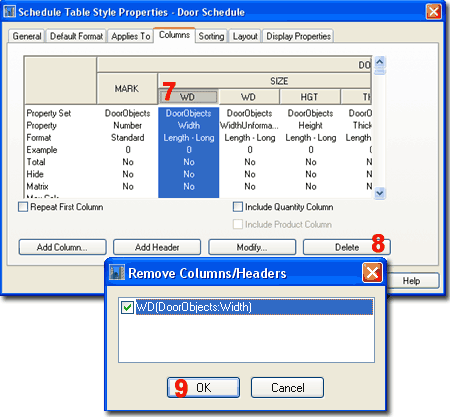
When you are done with Step 9 above, your Door Schedule should complete but the problem is that it will not show the right Width value. In fact, it should show the exact same value as the old "WD" Column.
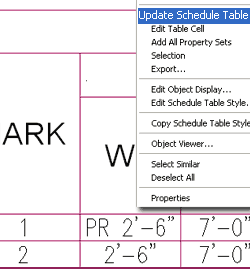 Illustrated
to the right I show the steps required to fix the missing "PR" problem.
Illustrated
to the right I show the steps required to fix the missing "PR" problem.
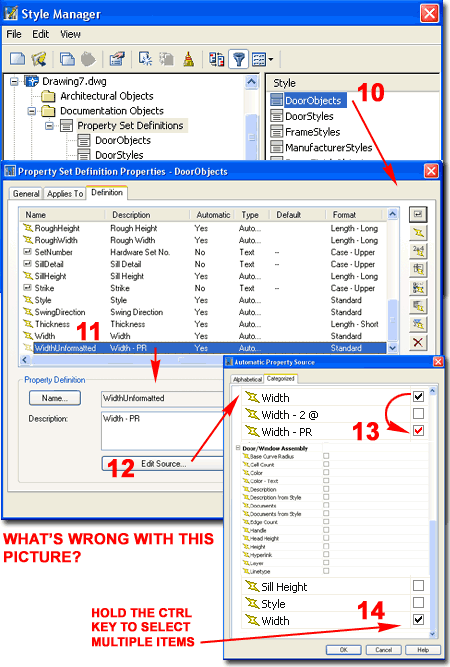
By using the Style Manager for Property Set Definition Styles, locate and Modify the ( 10 )DoorObjects Style.
On the Property Set Definition Properties dialog, ( 11 ) highlight the "WidthUnformatted" Automatic Property Name and use the ( 12 ) Edit Source... button to access the Automatic Property Source dialog. By scrolling down in the Automatic Property Source dialog you should find that the "Width" Property Source has been checked but we can change it to the "Width - PR" Property Source. Go ahead an Uncheck the "Width" and Check the ( 13 ) "Width - PR" but after you have done this, hold the ( 14 ) Ctrl key down and Check the "Width" Property near the bottom and under the Door/Window Assembly category. If you don't re-check this last "Width" Property, your Schedule will not be able to read Door/Window Assemblies. You should get an Alert dialog because you have two different Properties Checked but in this case, that's okay.
Note:
It is likely that the Description for the "WidthUnformatted" Property is
erroneous and should simply say "Unformatted" but I figure we could make the
Source match the Description rather than go through the trouble of creating
a New Property Name ( maybe called "Width - PR" ). Perhaps that is
something you will want to do for clarity. If so, be sure to use this
new Property Name in the Schedule Table Style.
Did it work?
Did you see how I read "Width - PR" in the Description Field and made an assumption that burned up valuable time?
To make this effort a permanent part of your library you will need to save the changes to the Schedule Table Style and the DoorObjects Property Set Definition Style into the appropriate Style files.
For the Schedule Table Style I recommend that you simply copy the existing Door Schedule Table Style, modify it and save it with a new file name. Then, add it to your Tool Palette. To save the DoorObjects Property Set changes, you'll need to make the changes to the DoorObjects Property Set in the source "PropertySetDefs.dwg" file. For information on how to do things like that you may want to subscribe to the Architectural Desktop 4 Development eGuide.