To get the complete set, subscribe to one of our e-BOOKS.
And this is just our ADT 2 material, the ADT 3 material is far superior.
The main guide in this series will provide supporting information and extensive explanations of why some of the steps have been taken on this exercise. For supporting information and more in-depth material, refer back to the main guide.
Create a custom Wall
Style for a perimeter retaining wall.
Create a custom Wall Style for column footings.
Create a Space and use it for a concrete slab.
Create a Structural Grid
Automatically Annotate a Grid.
Automatically Dimension a Grid.
Use DesignCenter to Add basic annotations.
To follow this exercise:
Create a New project Folder on your computer.
![]()
Download the following files to your new project folder:
| Download | Description |
| ADT_demo_foundation_finished.dwg | Completed Sample to reverse engineer, etc. |
| ADT_ex_foundation.dwg | Exercise Base Sheet - required |
| e_1_pln.dwg | 2D R14 Xref file - required |
| project_titleblock.dwg | Layout Xref Titleblock - not required but helpful. |
| project_style_standards.dwg | Layer Standard - not required. |
| Trouble downloading, try this Zip set. Complete set of exercise files Zipped |
Load Architectural Desktop 2.0 and open "ADT_ex_foundation.dwg".
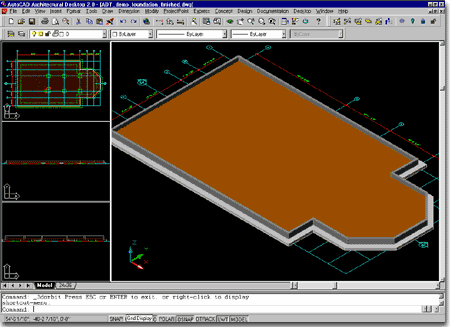
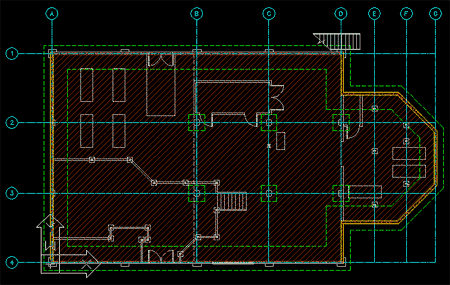
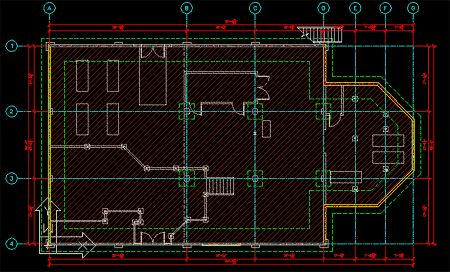
Illustrated to the right and above, right, are what you will get if you open the completed exercise file.
This drawing has not been set up for ADT, so though you may be able to create ADT objects in this file, they will not necessarily be the right size or on the right layers.
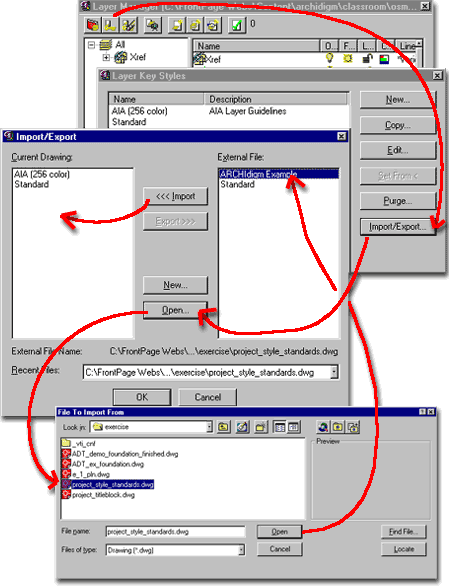
1. From the Desktop pull-down menu, select Layer Management > and cascade over to Layer Manager... (illustrated to the right, top). On the Layer Manager dialogue box, pick on the Layer Key Styles button (second from the left). On the Layer Key Styles dialogue box, pick on the Import/Export button to open the Import/Export dialogue box. On the Import/Export dialogue box, pick on the Open... dialogue box and on the File to Import From dialogue box, go to the current project folder we created for this exercise (the one you downloaded the exercise files in to). In the current project folder, look for a file named "project_style_standards.dwg" and Open it.
Back on the Import/Export dialogue box, you should now see the "ARCHIdigm Example" External File name. Highllight this file name and pick on the <<<Import button to bring it into the Current Drawing.
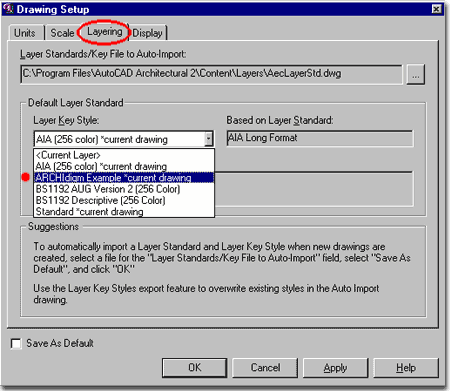
Close all remaining dialogue boxes
On the "Layer Key Style:" drop-down list, you should now see the "ARCHIdigm Example" option. Select this layer key style and pick the Apply button.
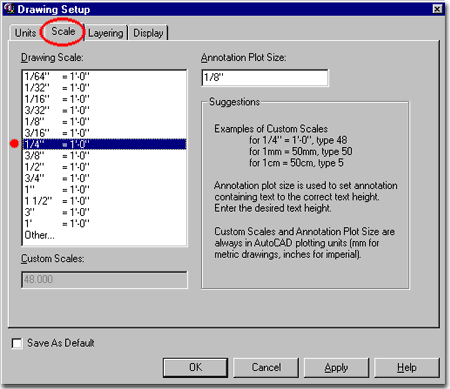
Now pick on the Scale tab of the Drawing Setup dialogue box.
You can check the Units tab to see if you want to make any personal preference changes there but basically we have changed the most important features for starting work. Later we can work on some of the Display tab items.
Summation:
By importing a Layer Key, you are basically learning how to use your own standard
for how you want your layers to be named and colored; plus settings for layer lineweights
and linetypes. The ADT objects that you will now use in this exercise should only
use the basic eight colors from AutoCAD's color index. The default Layer Key in ADT
will utilize numerous colors from the AutoCAD color index often creating havoc in offices
where there is a definitive color standard.
You can read more about the Layer Manager and Layer Keys in Part 1 of the Architectural Desktop Guide.
Since a concrete retaining wall is a little more complex than a simple rectangular shape, we have to define the different "Components" our wall is made up of.
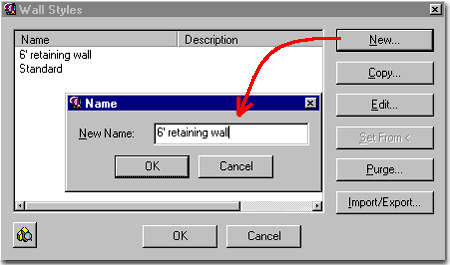
From the Design pull-down menu, select Walls > and cascade down to Wall Styles...
On the Wall Styles dialogue box, pick on the New... button and type in a New Name: for our custom retaining Wall Style. In this example, right, I used the name: "6' retaining wall". Feel free to use any name you want and any dimensional proportions.
Hit the OK button to get out of the Name dialogue box.
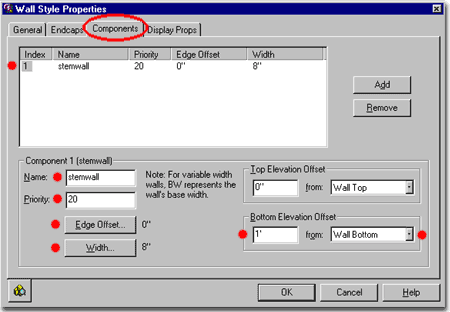
On the Wall Styles Properties dialogue box, pick on the Components tab and notice that you have one default component. All walls have to have at least one component that defines how wide the wall is (or, in other words, how far apart the double lines are in plan view).
Pick on the number "1" under the "Index" column.
Name: text field you can type in a name for the portion (component) of the concrete retaining wall that we want to define first. In the illustration to the right, I use the name, "stemwall" for the upper portion of a two part wall ( like a giant upside down T ).
Priority: text field you can specify a larger number than 1 to reduce this wall in "clean-up" rank should it ever encounter another type of Wall Style. This part is not critical on this particular exercise but is something you should know about.
Edge Offset: change the values on the Edge Offset dialogue box to a very simple and easy to comprehend system by making the value equal zero ( 0 ). This means that the stem wall will be drawn at a baseline out from zero ( a number easy to remember ).
Width: change this value on the Width dialogue box to 8" (or any other value that meets your desires for the wall portion of your concrete retaining wall).
Top Elevation Offset: since this wall should simple go as high as we specify when we draw it, we should specify that we don't want any offset from the top: 0" from Wall Top .
Bottom Elevation Offset: since we are planning on building a concrete retaining wall that has a base or spread footing we don't need the stemwall portion to merge into the base. So, set the Bottom Elevation Offset to a thickness equal to the thickness of your concrete base (as discussed below). In the illustration to the right, I show Bottom Elevation Offset as 1' from Wall Bottom.
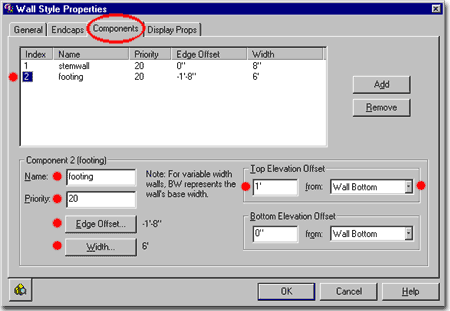
Index: 2
Name: footing
Priority: 20 ( optional )
Edge Offset... -1'-8" Use this value to offset or push out the base of the concrete. It could be more or less depending on how much you want around the exterior of the building.
Width... 6'-0" Use this value for the actual base width. A regular residential perimeter footing would not be this wide but since this exercise is about a retaining wall, it should be quite wide.
Top elevation Offset: 1'-0" from Wall Bottom. Since we are now working with the base of our wall, this component should be limited as to how high it will go. By setting the Top value 12" from Wall Bottom, the thickness of the base is now limited to 1'-0".
Bottom Elevation Offset: 0" from Wall Bottom. This is the same as with the stemwall value and just assures us that this wall will begin at the ground level or 0 of the Z-axis.
Pick on Display Props tab of the Wall Style Properties dialogue box and set the display pull-down menu to Plan ( it should already be set ). On the Property Source column, pick and highlight the Wall Style source ( not the System Default source ). Now, pick on the Attach Override... button at the bottom of the Display Props tab and pick on the Edit Display Props... button.
On the Entity Properties dialogue box, pick on the Layer/Color/Linetype tab. Pick and highlight the Component named Below Cut Plane and set a unique Color and Linetype for this component. In the illustration to the right, I have set the color to 3 - Green and the Linetype to DASHED. These settings will make the base of the concrete retaining wall have a unique color and be dashed.
You may want to pick and highlight the Hatch 1 (stemwall) Component and set the color to the lightest color you use for printing.
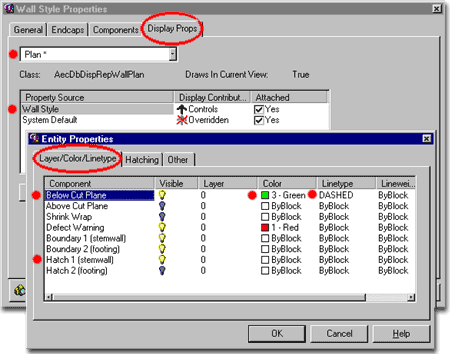
On the Other tab of the Entity Properties dialogue box change the Cut Plane Height: text field to a height that matches that of the concrete retaining wall's base thickness ( I show 12" or 1'-0" because that is how thick I made the footing). This value can be higher up the retaining wall but not lower if you want it to be green and dashed as per the Below Cut Plane values you set above.
OK your way out of all these dialogue boxes and get ready to test this work
Summation:
Though ADT comes with numerous pre-set Wall Styles,
"real" world architecture never seems to run out of unique conditions so it
becomes very helpful to know how to build one from scratch or modify those that come with
ADT.
You can learn more about Wall Styles and how to load the numerous pre-set Wall Styles that come with ADT in Part 2 of this Guide.
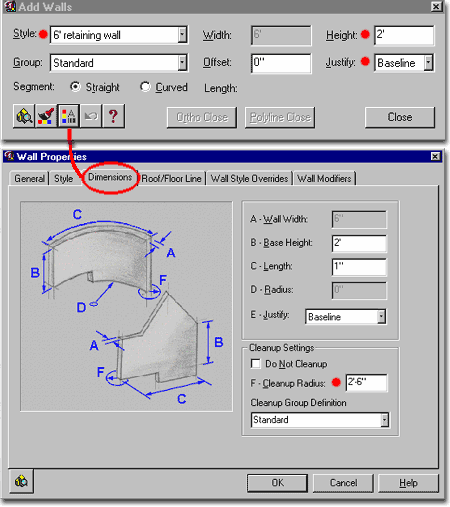
Once you have defined a custom Wall Style you can use the Add Walls dialogue box to make it current by selecting it on the Style: drop-down list. Illustrated to the right, I show that I have selected the "6' retaining wall" Wall Style that we created above.
We can ignore a few of the options on this dialogue box for this example and simply set a Height: value appropriate for how high you want the retaining wall. I show a Height: value of 2'-0" because I don't need the wall to run the full 8' -0" or so at this time, I simply want enough height to provide the right 2D and 3D graphic information ( we'll see this later ). It does have to be, at least, a littler higher than the thickness assigned to the base footing.
For Justify:, I show that I have set this value to Baseline because when I draw this wall, I want the zero-of-the-wall to be the point from which the wall is justified or drawn. Think of it like a series of parallel lines; you can choose the outer most right, the inner most left, the dead center or which ever line was started at an Edge Offset value of 0 .
Unfortunately, we have to make one more important setting before we can get going with the work of drawing this wall. On the Properties button on the Add Walls dialogue box, illustrated to the right, Architectural Desktop needs to be told that this is an unusually wide wall that requires an unusually wide Cleanup Radius. On the Dimensions tab of the Wall Properties dialogue box, change the F- Cleanup Radius text field to a value that usually equals or exceeds one-half the widest portion of your wall; i.e, if your wall is 6'-0" wide then the Cleanup Radius should be approximately 3'-0" or greater. In the illustration to the right, I show that I have broken this basic rule by setting the Cleanup Radius to 2'-6" for a wall that is 6'-0" wide - this works but it is a matter of trial and error - use the rule if in doubt or when experiencing strange wall corners/errors.
Pick the OK button
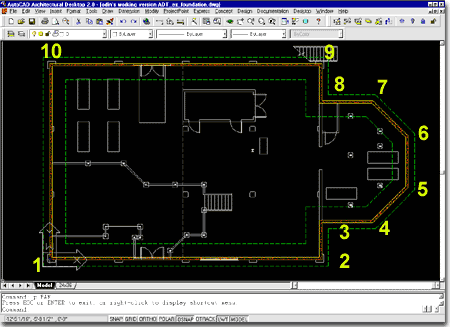
If you followed my numbers on this exercise, the Wall Style was designed to be drawn from left to right if you want the wider portion of the base footing on the inside of the building ( the norm. on retaining walls ).
I like to use the Endpoint Osnap and then just pick along the Xref'd drawing as illustrated to the right. For the last leg, between step 10 and step 1, you can use the Polyline Close button on the Add Wall dialogue box.
Note:
I have noticed that some old-time AutoCAD users seem a little thrown off by the fact that
the Add Walls dialogue box has to stay on the screen while drawing walls. It is
there for a good reason despite the space it takes up; you can work with the Add
Walls dialogue box while drawing thus allowing you to choose Curved or switch Styles
on-the-fly.
Give it a try and see if you can figure it out. Use the retaining wall example as a guide. If you can't get it, cheat and open the finished version of this exercise to reverse engineer it. You can do this by going to Wall Styles and use the Edit... button on the "4' SQ Colm FTG"
Summation:
Adding a Wall in ADT is usually a simple matter of
drawing it like a regular line but sometimes there are other matters to consider since
this object carries with it numerous bits of information; from basic formatting issues to
3D geometry. If you begin to experience problems with objects in ADT, you have to
consider the "properties" of the object as a possible cause of the
problems. You can read more about Wall Properties and drawing
problems under Section 5 of Part 2 in this Guide
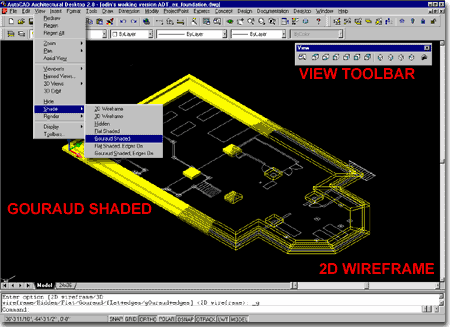
By default, you will get a 2D Wireframe image which can often be difficult to read due to all of the 3D lines so this is where Shading comes in.
From the View pull-down menu, pick on Shade > and cascade down to Gouraud Shaded. I select this one because it just happens to be my personal favorite but you should play with the other choices on this list to see if you have a personal favorite.
Note: When you Shade, you will need to set the Shademode back to 2D Wireframe in order to work in "normal" mode; otherwise you won't see the work as it will look when printed on paper. You can always type "shademode" to get to this command, followed by "2D" for the Wireframe setting. You should also note that the UCS icon is different when you are working in Shaded mode.
Use the Top button on the View toolbar to set this drawing back to plan view or you can type "plan" <enter> followed by "w" for World on the command line.
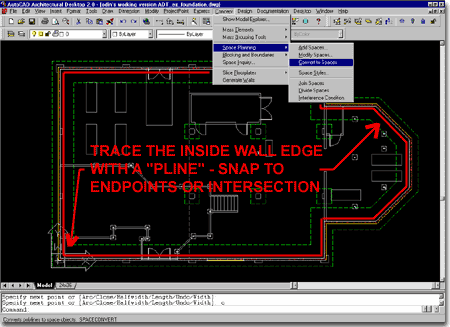
In the case of a concrete slab, you will not find any tools or commands that will guide you to the solution unless you have a quick sense of problem solving with limited tools. My solution is to use a type of object designed for helping in the design phase of a project called a Space.
First, trace the inside edge of the stemwall with a Pline ( polyline ) as illustrated to the right.
From the Concept pull-down menu, pick Space Planning > and cascade down to Convert to Spaces. Pick the last pline just created.
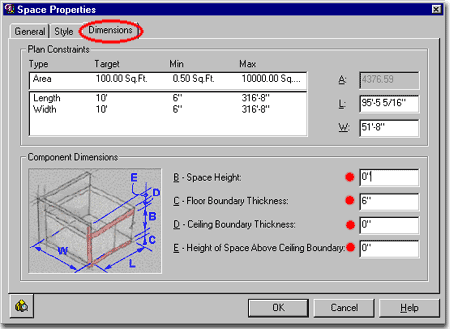
On the Space Properties dialogue box, illustrated to the right, pick on the Dimensions tab and set B - Space Height, D - Ceiling Boundary Thickness and E - Height of Space Above Ceiling Bounday to zero ( 0" ). Set C - Floor Boundary Thickness to the value you want for the concrete slab inside this foundation plan - I show 6".
Pick the OK button.
Congratulations, you have just achieved something this
program was not really set up to do yet and you can use this trick for many problems
including Floors, Decks, Mezzanines and Bridges.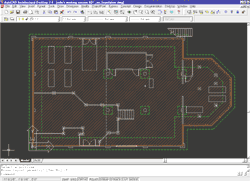
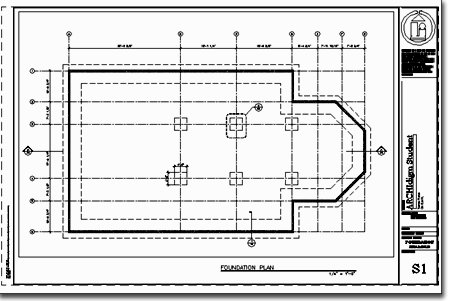
You should see brown 45 degree cross-hatching within the foundation plan now. View it in isometric and try the shade command again as described in section 5, above.
Summation:
Since ADT is relatively young in terms of development
cycles ( 2.0 ), there are bound to be some problems when it comes to solving specific
architectural needs. In this example, we used a Space Object to compensate for the
lack of a Slab Object or more advanced forms of dealing with foundation designs. As
with all CAD programs creative problem solving is a big part of using ADT.
You can read more about Space Objects in Part 11 of this Guide.
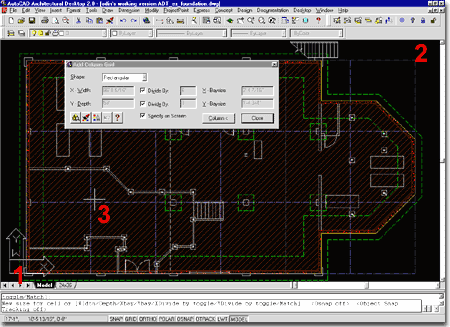
You might notice that a Grid object is automatically displaying on your screen based on some default values ( or those used last ), but we will have a bit of work to do in order to make the grid as irregular as that of this example building.
On the Add Column Grid dialogue box, make sure the Shape is set to Rectangular; then, check the Specify on Screen check box.
Use the Endpoint or intersection Snap to get the lower left ( 1 ) wall for the Insertion Point and the upper right ( 2 ) wall as the New Size ( or second ) point - as illustrated to the right. If you mess up on the snap points, you can adjust it later. For this second point, you can use Otrack to track two endpoints off of the wall corners or you can try to find the virtual intersection with apparent intersection Osnap.
For the New Cell size, simply move your cursor to a point approximately 1/3 up from the bottom and 1/4 of the length from the left ( as illustrated to the right ( 3 ) ). You should see a Grid automatically forming based upon the point where your cursor is at; this distance from the origin (insertion point) is used to evenly divide the Grid producing a 6 x 3 cell grid - you should see these numbers in the gray Divide by number fields.
For Rotation, make sure the angle is set to zero ( 0 ) and hit <enter>.
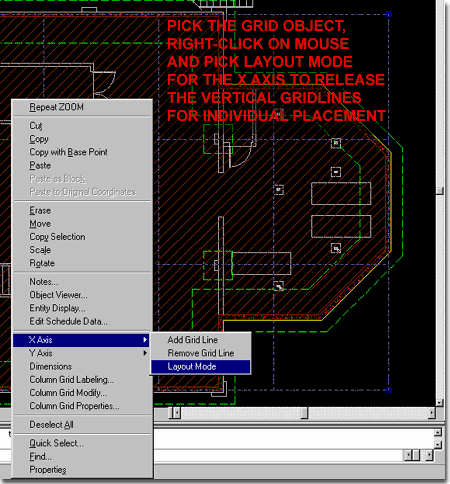
To make the final adjustments on the gridlines pick on the Grid object, right-click on your mouse, select X Axis > and cascade down to Layout Mode. On the command line, set the Layout Mode to "Manual" . This modification will allow you to freely Grip edit the Vertical gridlines by stretching them.
Now use Grips to stretch the vertical gridlines to the centerline of specific structural columns in the example drawing - see example screen capture a few steps down from here or look at the completed drawing file.
Repeat this process for the Y Axis Gridlines.
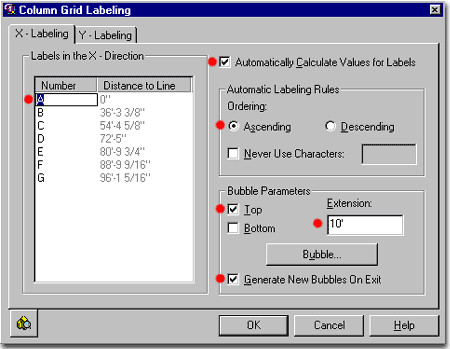
On the Column Grid Labeling dialogue box:
Check the Automatically Calculate Values for Labels check box.
Select the Ascending radio button.
Type a capitol letter "A" for the top field under the Number column.
Check the Top check box.
Set the Extension of these gridlines to 10'-0" away from the Grid object.
Check the Generate New Bubbles On Exit just so you will get any changes automatically should you come back and play with these settings.
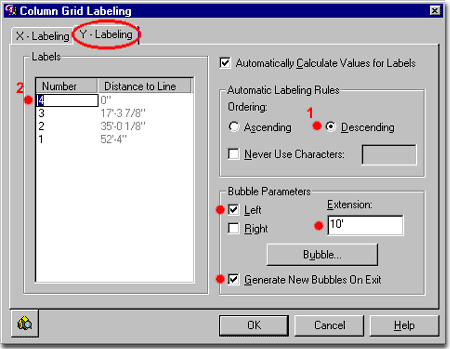
Check the Automatically Calculate Values for Labels check box.
Select the Descending radio button.
Type the number "4" for the top field under the Number column.
Check the Left check box.
Set the Extension of these gridlines to 10'-0" away from the Grid object.
Check the Generate New Bubbles On Exit just so you will get any changes automatically should you come back and play with these settings.
Summation:
Using the Grid routine in ADT demonstrates a bit about
how ADT objects differ in use and control from common AutoCAD objects. Adjusting to
new ways of working can be frustrating but the efforts a well worth the return; as we
discovered when we automatically annotated the Grid. Not only was it automatically
annotated, but changes are as easier than the original labeling setup.
You can read more about Grids and Grid labeling in Part 7 of this Guide.
If you just run this routine without setting a Dimension Style, you will get the default "Standard" so it may not look very good; but it will work.
Pick on the Grid Object, right-click on our mouse and select Dimensions under the Y Axis option. After you select Dimensions, you may have to wait a minute before seeing the completed work - see illustration to the right.
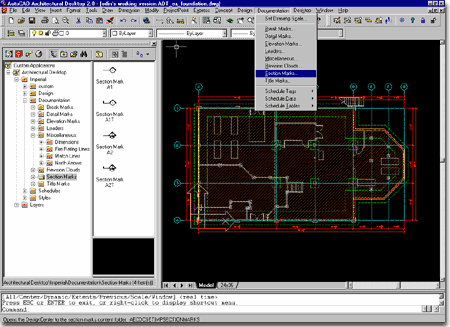
Selecting a category off the Documentation menu invokes the DesignCenter and automatically takes you to a folder under Architectural Desktop that holds block-like objects ready for drag-n-drop insertion into your drawing.
Summation:
Currently there are numerous Annotation and Symbol
features but you may find the libraries a little short on variety and variation. The
most difficult part of this area in ADT is getting old office standards set up to work as
these new autolayering objects.
You can read more about Annotating your drawings in Part 6 (Symbols) and Part 9 (DesignCenter) of this Guide.
Notice that the drawing looks just like it has been done in AutoCAD 14 or older version; 2D and everything. You can turn off the Space object layer so you don't see the hatch patter across the whole slab area.
This drawing has a viewport set up with a 1:48 zoom scale factor and the titleblock is based on an Xref file ( "project_titleblock.dwg" ).
You could easily create another Layout based on this one and set the view up for Isometric inside the viewport; thus utilizing ADT's 3D capabilities for presentation work and construction documentation at the same time.