One of the best tricks for adding "life" to Renderings is to use artwork. We like to refer to this as dressing up the scene. For this article I will run through the basic steps required to build a template Style for Framed Artwork in Architectural Desktop and how to create Artwork in VIZ Render to put in that Frame.
Once you have the skills required to create a custom Render Material in VIZ Render that will be used as art on an Object in Architectural Desktop, you should find those skills will take you pretty far in the whole VIZ Render - Architectural Desktop world.
Below I will discuss how to create a custom Curtain Wall Style for use as Artwork Frames but you can use all sorts of Object to create a similar result; including Mass Elements.
Though there are many different solutions for creating picture frames in Architectural Desktop, I favor using Curtain Wall Styles because of several features that will be revealed below.
Illustrated to the right I show that I have created a New Curtain Wall Style that I named "Wall Art 1". For the Primary Grid I set the default "Horizontal Division" to have "1" "Fixed Number of Cells". I also removed the default "Secondary Grid" by changing the Cell Assignment to "Default Infill". In the illustration to the right the default infill is listed as "Art" because I renamed it - see discussion below.
Illustrated to the right I renamed the "Default Infill" to "Art" just to clarify that when we are done with this exercise this Element will hold the actual artwork and thus act as a canvas.
For Panel Thickness and Alignment you will need to consider how Wide and Deep your Frame dimensions will be and how far back you want the Infill (canvas) relative to the surface of the frame. You may need to skip down to the next section, Frames, and then return here after you have figured out how big your frame will be.
Illustrated to the right
I show two frame examples: one left as "Default Frame" and the other
 named
"Classic Frame". You can create a simple rectangular picture frame by
setting a Width and Depth value but you can create a very elaborate picture
frame by using a custom Profile as illustrated to the left.
named
"Classic Frame". You can create a simple rectangular picture frame by
setting a Width and Depth value but you can create a very elaborate picture
frame by using a custom Profile as illustrated to the left.
Illustrated to the left I show that by visiting a few on-line Frame Shops, I was able to download a common frame outline that I traced in ADT and converted into a Profile by using the "Profile" command. See image right for how a custom Profile can be used for a Frame.
Illustrated to the right I show that I have used the "CurtainWallAdd" command to draw my new "Wall Art 1" Curtain Wall Style. Since this Style only uses one Division, no matter how large I make it, it will always have a single frame around it.
This Object will now need some work under the Materials tab and Display Properties tab of the Curtain Wall Style. Before we complete the Style settings, I will need to discuss how to use VIZ Render to create custom Render Materials. Once this work is complete, you can use a Style like this as a template for all sorts of wall art.

Illustrated to the right I show most of the steps required to create a custom Rendering Material in VIZ Render. To create custom Rendering Materials (not to be confused with Material Definition Style in ADT) you do not need to link a file from ADT to VIZ Render, you can simply launch VIZ Render form the separate desktop icon or Windows Start menu.
On the Materials Palette, go to the Scratch tab and use the Create New tool to create a new material. The default material should be gray and based on the Ceramic Tile Template. Select this material, right-click and Select Properties off the Context menu to invoke the Material Editor dialog.
On the Material Editor dialog, Rename the material as you see fit. In this example I named my material "Wall Art The Scream". Under the Templates section, choose a template that best matches the type of art you are creating or produces the quality you want. Since you can always come back and change this template, feel free to experiment. For this example I set it to "Paint Flat".
Next to the "Diffuse Map" setting, use the button with the "None" label to activate the Material/Map Browser dialog. On this dialog, Select "Bitmap" and Select the OK button. This action will take you back to the Material Editor but with a new set of options for Bitmaps.
On the Material Editor, under the Texture Tiling and Output section for the Bitmap, Uncheck both the U and V Tile boxes because art usually does not repeat. Under the Bitmap Parameters section, use the Bitmap button to Select any raster image you may have lying around on your computer. In the illustration to the right I show that I have selected a well known piece of art that I "borrowed" from an on-line source. Keep in mind that raster images such as this can be created from digital photographs, scanning or even rendered work you may have done in the past. One of my favorite pieces of wall art, out of boredom I guess, is to take the final rendering of the space and make it one of the background pieces of wall art.
Use the "Go to Parent" button [ Ç ](or use the Diffuse Map drop-down list) to return to the main page of the Material Editor.
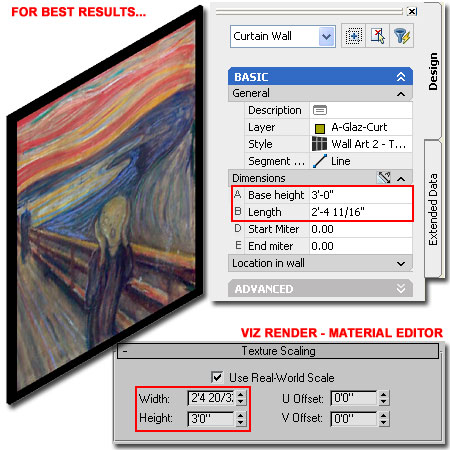
Under the Texture Scaling section of the Material Editor, use the Width and Height settings to set the exact size you expect to use for this Rendering Material.

Once you have completed the work discussed above, you should find that you have a Render Material on VIZ Render's Materials Palette that you can drag over to the current working space in Architectural Desktop.
As you experiment with the lessons learned in this article, feel free to go back to VIZ Render and make changes to the Render Material. You can continue to drag the same Render Material over to the same ADT drawing file for as long as you wish. Look to the command line to confirm that the Render Material is being redefined. You can also see this in real-time during Shaded Modes.
Now that a Render Material has been added to the ADT drawing file, you will need to assign it within a Material Definition Style.
Illustrated to the right I show that I have returned to the "Wall Art 1" Curtain Wall Style and Selected the Materials tab. Under the Component column I show the Infill that I named "Art" earlier. This is the component that will serve as the canvas and thus needs a Material Definition Style that uses the Render Material created earlier in VIZ Render.
Use the "Add New Material" button to activate the "New Material" dialog where you can Name it. Once you have named your Material Definition Style, use the OK button to activate the Material Definition Properties dialog as illustrated to the right.
The subject of Material Definition Properties is exhausting and, in my opinion, one of the worst aspects of Architectural Desktop. For every Display Representation you will need to use a Style Override and set each list of Display Properties.
Note:
Notice that I have already created and added a Material Definition for the
Black Frame.
Illustrated to the right I show the Display Properties for one of the numerous Display Representations discussed above. Since this article is primarily about Rendering Materials, I will leave the discussion of the Layer/Color/Linetype tab for another time but you probably will not what any Hatch patterns for this example.
On the "Other" tab of the Display Properties dialog I show that I have used the Render Material drop-down list to Select the "Wall Art The Scream" Rendering Material created in VIZ Render earlier in this article.
Of the three Mapping choices, you should find that "Face Mapping" will do the best job of placing the artwork on the Curtain Wall Infill.
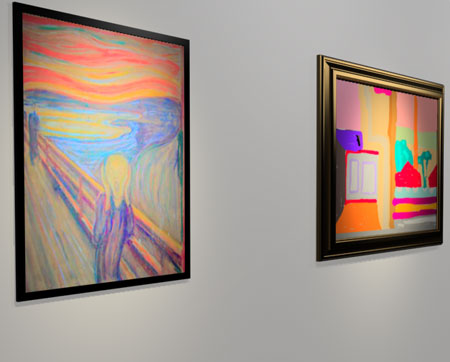
Illustrated to the right I show what you should expect to see after doing all the work discussed above.
For best results with artwork, match the Base Height and Length of the Curtain Wall with the Width and Height set for the Texture Scaling of the Render Material in VIZ Render. If you use exceptionally Wide Frames, you will need to compensate for the Length lost to the frame. By default, the lower left corner is used for the base of the mapping but if you find that you need to make adjustments to how the Render Material is positioned on the Object, read the discussion below.
Note:
In order to see Render Materials under Shademodes in Architectural Desktop,
you must have the your Graphics Display set to "Enable Materials" - See
Options dialog, System tab, Current 3D Graphics Display Properties button,
Render Options.
Once you have picture frames and artwork all ready to go, one of my favorite tricks is to use the "WallAnchor" command to lock the Curtain Wall to the Wall just as a Door or Window. You might think that I should just have used a Door/Window Assembly Style if I wanted to do this but that Object will cut a hole in a Wall and affect the Plan View in a way that might have dire consequences for Construction Documents.
You could also try using Window Styles for artwork but you risk having them show up in Schedules and if you Anchor them, you have the hole problem discussed above. This doesn't mean that I haven't done it in high pressure situations.
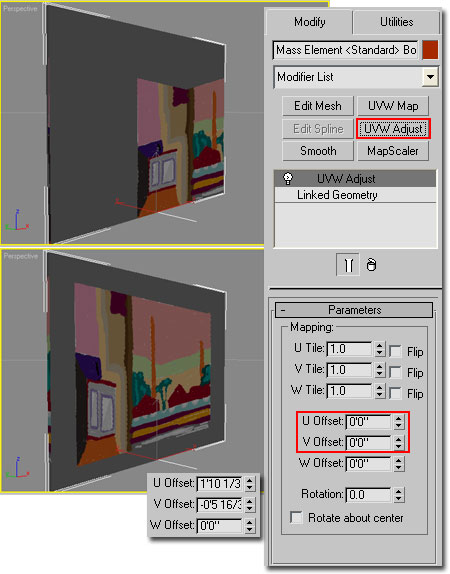
Illustrated to the right I show an example of how I attempted to put a piece of artwork on a randomly sized Mass Element in Architectural Desktop. When I Linked the ADT file to VIZ Render my Render Material was started at the bottom middle of the Mass Element.
VIZ Render has several Mapping tools that you can use to work with and correct the problem described here. To Modify a Render Material's Mapping, Select the Object holding the material and look for the UVW Adjust button on the Modify Palette.
Under the Parameters section of the UVW Adjust Modifier, you can use the U and V Offset value fields to move the Render Material around on the face of the Mass Element or similar ADT Object ( including the Curtain Wall Infill ).
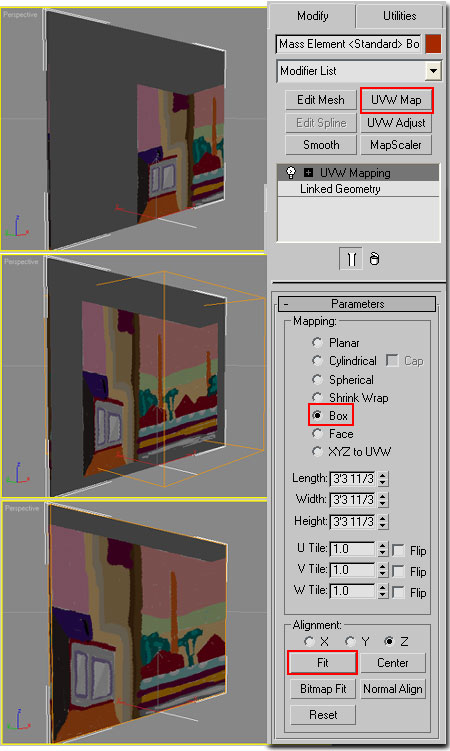
Illustrated to the right I show another option for working with the same problem I discussed above. Using the UVW Map Modifier happens to be one of my favorite tools because it's very quick.
Under the Parameters section of the UVW Map Modifier, Select the most appropriate Mapping type for the Object you are working with. In this example I show that I am using "Box" which is the most common option I use for all sorts of Objects.
After setting the Mapping type, you can use the Alignment options to set how you want the Render Material to sit with respect to the Object. In this example I show that I am using "Fit" because this option stretches the material out to match the Object's proportion while maintaining aspect ratio ( which means in some cases the match will not be perfect). If you need a perfect match, you may need to work with the MapScaler Modifier to increase or decrease the size of the image.