 eParts
for AutoCAD
Architecture
eParts
for AutoCAD
ArchitectureFlat Panel Televisions Installation Guide
Contents:
Greetings
---- Installing eParts ---- Using
eParts ----
Modifying eParts ----
Reporting Problems
|
|
eParts
for AutoCAD
Architecture Flat Panel Televisions Installation Guide
Contents: |
| 1Greetings | .1-1 INSTALLATION GUIDE | ||||||||||
| Introduction Thank you for purchasing an eParts product from ARCHIdigm. eParts are comprised of collections of specific Object Types or Categories such as Refrigerators, Furniture and Street Lights. Many of these Objects come from our eKit products that offer a whole suite of tools for specific tasks such as creating kitchen or bathroom designs. Most eParts have been created as Multi-View Blocks (MvBlocks) consisting of Model, Plan and Mask components. Elevation Views are derived from the Model. Masks are for Plan use only and have been created by using a custom AecPolygon Style with a masking effect that can be turned on or off at any time. Some MvBlocks have a higher level of detail under the High Detail than the Low Detail. Some eParts, like Street Lights, have also been configured to repeat at intervals that you can control by working with the custom Curtain Wall Styles. The Flat Panel Television in this eParts product have been created from a single custom Curtain Wall Style that has been combined with Mass Elements. |
 |
||||||||||
| 2Installing eParts | 2-1 INSTALLATION GUIDE | ||||||||||
Downloading and Intalling the Files
Note: Note: The Password is located in your confirmation e-mail; sent out after purchase. If you did not receive this e-mail, it may have been blocked by a spam filter. Contact info@archidigm.com to get a copy. |
|
||||||||||
| Provide
Installation Password The password for your product is located in your purchase confirmation e-mail under the heading, "keycode". Use this password to complete the installation. |
 |
||||||||||
Add Catalog
STEP 2: Once you have Opened the catalog file, you should find that you have a new Catalog Library with a Graphic Image that you can Select to access all of the Tools and Tool Palettes discussed below.
|
 |
||||||||||
Add Texture
Maps Search Path
STEP 3: For Flat Panel Televisions eParts, add "C:\Program Files\ARCHIdigm\Flat Panel Televisions 2010 eParts" to the search path.
|
 |
||||||||||
Add Tool
Palette and Tools
STEP 4: Tip: You can use the Ctrl+A keystroke technique to highlight all tool icons under a Catalog Category or you can Select off in a corner and use the Selection Window to highlight a group. The Shift and Ctrl keys work to assist in Selecting items just as they do in Explorer. |
 |
||||||||||
| 3Using eParts | 3-1 INSTALLATION GUIDE | ||||||||||
| Adding
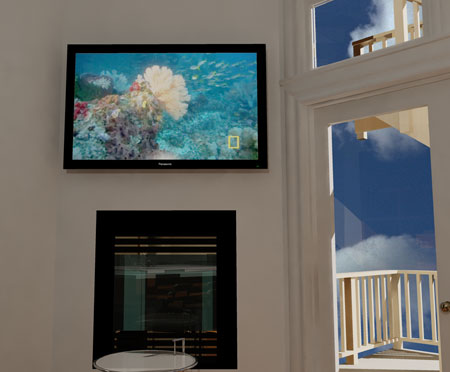
Flat Panel Televisions The Television Objects will insert as MvBlocks. Each MvBlock includes a Masking Block created from a custom AecPolygon Style. Wall Mounted TV's have been set to insert at 60" (1524mm) above the finished floor. Free Standing TV's insert at 0" above the finished floor. Under the Alternate Screen Image section of the Tool Palette you can use the "Appliances.Television.Screen.CNN" button to import a screen capture that can be used as a Material on the surface of these televisions. When you pick this button, you will be queried to "Select a Component or an Object"; hit the Escape Key instead. Use the "Change Screen Image" button to assign the newly imported Material Definition Style to the television screen. These televisions use a custom Curtain Wall Style, named "Appliance_Television_HD_Frame_Screen", for the main body and screen. By assigning a different Material Definition Style to the Screen Component, under the Materials tab, you can change the screen image. Labels have been included for basic tagging of these MvBlocks. The default Style Label for these television MvBlocks has been set as, "HD TV 37" ", for example. |
 |
||||||||||
Template Files and Display Configurations
All ePart Objects have been optimized for
work using the AutoCAD Architecture's "Aec model
Illustrated to the right is an example of how the three primary Display Representations, Low, Medium and High Detail, affect ePart Objects. Most ePart Objects include an AecPolygon Style set to Mask background information. This mask can be turned off if desired.
Low Detail
Medium Detail
High Detail
|
|
||||||||||
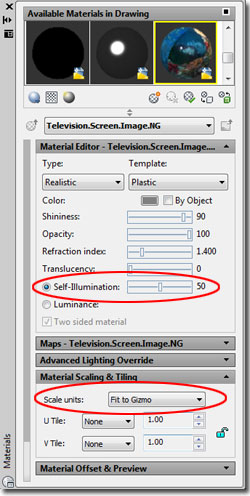
Rendering
Flat Panel Televisions
When
creating a Rendering with one of our televisions, the main Material is
obviously the image on the screen. We included three Rendering
Materials with matching Material
The other key aspect of getting a good television image has to do with the way your image is scaled to the surface object. Un the Material Scaling & Tiling section of the Materials Palette, notice that I have it set to "Fit to Gizmo" so it stretches whatever Image I assign, under the Maps section, to the screen component. The default product logo has been set to use ACA's default "...Stainless.Satin" Rendering Material. Depending upon your scene configuration you may find that you will need to set this to "Metal - Polished" (under Template) or a simple "Plastic" color to get the results that you want.
|
Note: |
||||||||||
| 4Modifying eParts | 4-1 INSTALLATION GUIDE | ||||||||||
Muti-View
Block Anatomy
Most ePart Objects involve a complicated set of regular Blocks that have been assembled into a Multi-View Block. The complexity varies and may never be something you will have to think about but if you ever have a need to change one of these Objects, you will need to understand how they have been assembled. The most important thing that you need to understand about MvBlocks is that there is always a duplicate Block of the 3D Model Representation. By looking under the Model Display Representation on the Multi-View Block Definition Properties dialog, you can find the name of this matching 3D Model Block. By inserting this Block you can use Refedit to make changes to things like Material Assignments, Height, Width and so forth. Multi-View Blocks also provide the option to set different Blocks for Top (Plan) Views and these may even be different for Low, Medium and High Detail Display Representations. A feature of our eParts Objects is the use of custom AecPolygon Styles that act as Masks to hide Objects below. If these mask blocks produce undesirable results, you can turn off the masking feature - see comments below. |
 |
||||||||||
Masks, AecPolygons and MvBlocks
Most ePart Objects include a Masking Block as part of their structure. These Masking Blocks have been created by making a Block of an AecPolygon Object set to a custom Style where the "Use Background Mask" feature has been activated. By typing "AecPolygonStyle" on the command line, you should see a list of Styles with the word "mask" as suffix. By Editing any of these Styles and unchecking the "Use Background Mask" feature found under the "Other" tab you can remove the masking behavior - see illustration right. Mask Blocks may produce undesirable results when printing from Model Space due to the Black Background but this is not a problem when printing from Paper Space Layouts. The "DrawOrder" command can be used to move Mask Blocks up or down in the display stack. Note: |
 |
||||||||||
Materials and
Mass Elements
Most ePart Objects incorporate Mass Elements as a means of providing a 3D Model that will accept Material Definition Assignments. In other cases native Object Styles, such as Structural Members, Curtain Walls and Railings have been used whenever feasible and their Material Definition Assignments are managed by the Object Style. For this product, Mass Elements have been assigned unique Mass Element Styles allowing you to change Materials and/or Display Properties through the Mass Elements Style Window; see illustration right. Because the main television body and screen has been created with a custom Curtain Wall Style, you will need to access the Curtain Wall Style Window to access its components and Material assignments. |
 |
||||||||||
| Materials - an
alternative approach to changing the Rendering Material If you are in a hurry and don't have the patience to change Material Definition Assignments remember that you can always change the Material Definition Style itself. For example, just because a Material Definition Style is named "Streets.Glossy.Black.Green" does not mean that you can't change the actual Rendering Material to a Glossy Red.
|
 |
||||||||||
| 5Reporting Problems | 6-1 INSTALLATION GUIDE | ||||||||||
|
Responding Let us know what you would like to see improved. |
|
© Copyright 2010 ARCHIdigm. All rights reserved.
 (imperal
- ctb).dwt" and "Aec model (imperal -
stb).dwt" default template files.
(imperal
- ctb).dwt" and "Aec model (imperal -
stb).dwt" default template files. 
 Definition
Styles (one Material is just clear glass). The two sample Materials
that use images have been set to use the "Self-Illumination"
property, set to 50%, to produce a glow or brightness typically associated
with televisions. You can modify this value as may be required in your
scene.
Definition
Styles (one Material is just clear glass). The two sample Materials
that use images have been set to use the "Self-Illumination"
property, set to 50%, to produce a glow or brightness typically associated
with televisions. You can modify this value as may be required in your
scene.