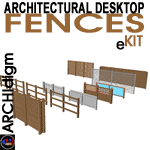
 Architectural Desktop 3 - Fences eKIT
INSTRUCTIONS
OVERVIEWContents:
Greetings ---- Getting Started ---- Using this KIT ---- Reporting Problems
| Architectural Desktop 3 - Fences eKIT INSTRUCTIONS OVERVIEWContents: Greetings ---- Getting Started ---- Using this KIT ---- Reporting Problems |
| 1Greetings | .1-1 INSTRUCTIONS | ||||||||||||||||||||||||||||||||||||||||||||||||||||||||
| Introduction Thank you for purchasing ARCHIdigm's Fences eKit. We hope it proves beneficial both in productivity and presentation. If you find that we have overlooked a major fence element or wish to make a recommendation for improving this kit, please feel free to contact us. We are also happy to receive contributions of Styles and objects if you have them and we will certainly credit you and/or your organization for the contribution(s). |
 |
||||||||||||||||||||||||||||||||||||||||||||||||||||||||
| Overview The Fences eKit comes from our personal efforts to maximize the 3D output of ADT while working at the rate of traditional 2D AutoCAD drafting. What we focused on therefore, was the process of getting linework in 2D Construction Documents that are equivalent to simple Line and Pline outlines but with the added benefit of getting good Elevations, Perspectives and 3D Renderings. Fences have been created with Railing Styles because of the various options and features offered by this object. In many cases we have added numerous custom Blocks to make fences that look more like actual fences instead of railings.. Because of these custom Blocks you may find some modifications a bit tricky; but if you are well versed in working with Styles and custom Blocks, you should be able to modify these styles to do almost anything you want. |
|||||||||||||||||||||||||||||||||||||||||||||||||||||||||
| 2Getting Started | 2-1 INSTRUCTIONS | ||||||||||||||||||||||||||||||||||||||||||||||||||||||||
Download Files
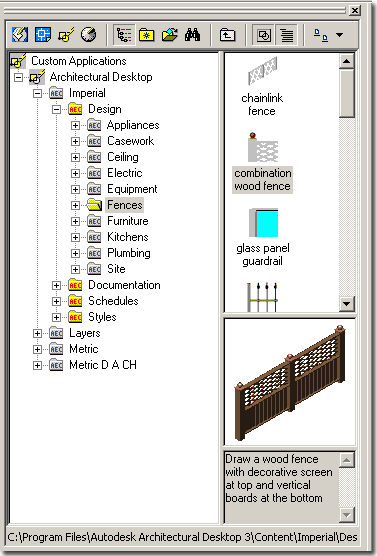
Included with this KIT you will also find a Rendering Folder containing a sample Rendering Template File and sample Materials that are designed to demonstrate how easy and how quick it is to create great looking renderings with little to no additional work. Put the Rendering Template File anywhere you can gain quick access to it and copy the material files to the "Textures" folder under Architectural Desktop 3.3 Once you have added the Fences Folder to your ADT Content Folder, you should find that the DesignCenter will now see a new Content Folder - as illustrated to the right. From the Fences Folder, you can now drag-n-drop as with any other ADT content items. |
|
||||||||||||||||||||||||||||||||||||||||||||||||||||||||
| 3Using the Kit | 3-1 INSTRUCTIONS | ||||||||||||||||||||||||||||||||||||||||||||||||||||||||
Fence
Styles
This Kit was designed to be used through the DesignCenter in ADT but since it is basically comprised of Railing Styles with custom Blocks, you can employ any means you see fit to use this KIT. Illustrated to the right is an example of how the Fence Styles appear, once loaded into a drawing file, in the Railing Style Manager Window. In many cases, we tend to copy Fences from one design into another because they have unique settings that we don't want to bother repeating. The Copy/Paste method of importing ADT Styles is valid. You can also use the Import feature of the Style Manager to access other drawing files.
|
|
||||||||||||||||||||||||||||||||||||||||||||||||||||||||
Adding Fences
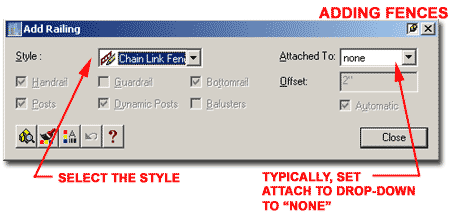
Since these Fences are actually Railing Styles, you can use the Add Railing dialog box to place them in your drawing. All of the fences in this Kit come with a set of pre-configured values such as a Width, Height and Justification but any style that has the prefix "X" in the Style Name will allow for variations of these settings. Railings generally don't have options on the Add Railing dialog so you will need to use the Properties or Style tools to make changes to these fence styles. When Adding Fences, you will not find many options for changes so accepting the default options is usually the best approach. After drawing a fence, you can use the Railing Properties dialog box to make Height and Distance adjustments - as discussed below. |
 |
||||||||||||||||||||||||||||||||||||||||||||||||||||||||
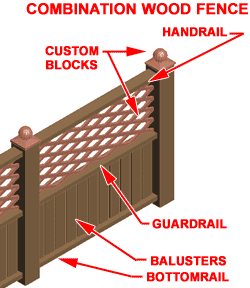
Modifying Fences
In the illustration to the left, for example, you can adjust the Height of the Guardrail but if you don't match the adjusted Height for the Handrail, the Custom Screen Block will protrude up through the Handrail. This object was actually created with a custom Window Style and if you look for it, you could alter its dimensions to match whatever you need here. |
 |
||||||||||||||||||||||||||||||||||||||||||||||||||||||||
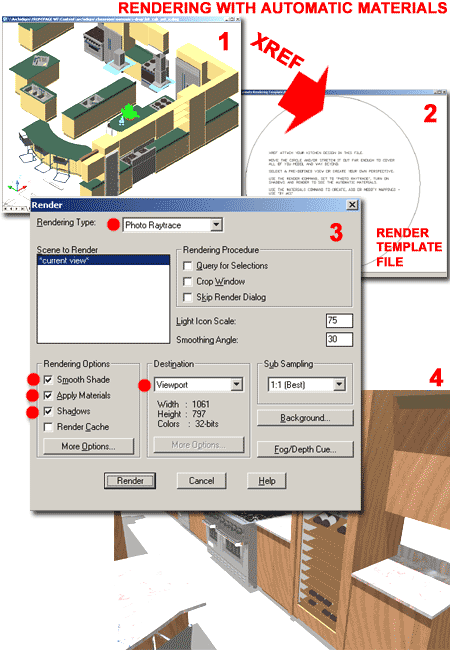
Rendering
A Rendering Template File has been included with this Kit and all you have to do is Xref your Fence Design into this Template file to get instant results. In this Rendering Template File, materials have already been configure to automatically map to the color assignments we set for the various objects and styles within this kit so metal fences will automatically render as iron and logs will automatically render as gray cedar/redwood. The great thing about the rendering template file system is that you can modify it, save it with a unique name and use it to generate another Fence rendering that uses completely different colors and materials; i.e, in one rendering you could have white painted fences but in another you could have stained cedar fences. Note:
|
 |
||||||||||||||||||||||||||||||||||||||||||||||||||||||||
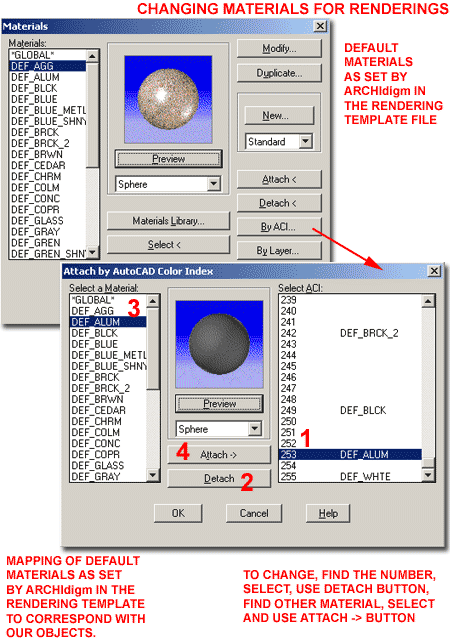
Materials
For all of the objects and styles in the this Kit, we have assigned default color values that were designed to work together with a default material map. The system we have employed here is actually part of a larger color system that we have been working on for a couple of years now. You can see the evolving color chart as it applies to ADT by looking for the "Aec Object Style Colors" chart on the Cover Page for the ADT Development eGuide and the ADT Presentation eGuide. Illustrated to the right I show what the Materials dialog box will look like when you work in one of our Rendering Template Files. The list of "DEF_*" materials indicate the default materials we have assigned to the Colors within the Multi-View Blocks and Object Styles that come with this Kit. You should find that there are more materials than we have used because we are continually adding materials in an effort to create a complete package that will cover everything from Foundations to Skies. You can use any of these materials to replace those that we have assigned by default and create completely different rendering results. Illustrated to the right I show the four basic steps required to change a default material mapping. 1) Find the Color Number assigned to the Multi-View object or Object Style Component and highlight it under the "Select ACI" column. 2) Use the Detach button to remove the default mapping assignment. 3) Find another Material in the "Select a Material" column and highlight it. 4) Use the Attach -> button to map the new material to the current Color. When you Render your scene again, you should see a new material in place of the previous one. If you wish to use a material that is not in the Default list, you can use the Materials Library... button on the Materials dialog box to Find and Import a material from AutoCAD's Texture Folder. |
 |
||||||||||||||||||||||||||||||||||||||||||||||||||||||||
| Chain Link Fence - Additional
Comments Our Chain Link Fence
is a bit unique due to the need for this object to be "realistic" in Elevations,
Isometrics and Renderings. In order to provide the best solution for all cases, we
used a Window Style with a 2D Muntin as part of the
Fence or Railing Style. To allow for a Chain Link look in
Renderings, we assigned the Glass Color 19 and included a Chain Link
image that will automatically be mapped to this Color in our Rendering Template File.
In order to make this obvious to you, the Glass is On by default and will Note:
|
 |
||||||||||||||||||||||||||||||||||||||||||||||||||||||||
| 4Reporting Problems | 4-1 INSTRUCTIONS | ||||||||||||||||||||||||||||||||||||||||||||||||||||||||
| BUY | Purchase the latest Fences Cabinets eKit to acquire this version as well. Newest version includes all older versions. | ||||||||||||||||||||||||||||||||||||||||||||||||||||||||
| Your
Job This Kit was developed first to serve our personal drafting, design and presentation needs and secondly to be an equally valuable asset in your toolkit for ADT work. This means that though we have done our best to remove all the bugs, there are likely to be some odd things that we just never encountered or thought about. If you find a bug or would like to recommend an improvement, please feel free to inform us at the following e-mail address: |
|||||||||||||||||||||||||||||||||||||||||||||||||||||||||
© Copyright 2003 ARCHIdigm. All rights reserved.
spell checked on Feb. 20, 2003

 To minimize the detail of Fences in Construction Documents, we altered the
default Plan Display Representation to use a linetype and/or Post location as illustrated
to the right. To alter this in any way, Select a Fence,
right-click and use the Entity Display... option on the
object specific pop-up menu to Edit Display Props... On the Layer/
Color/ Linetype tab you can alter the Linetype (see
"fence_centerline_plan"), turn it and other components On or Off and even change
the Colors.
To minimize the detail of Fences in Construction Documents, we altered the
default Plan Display Representation to use a linetype and/or Post location as illustrated
to the right. To alter this in any way, Select a Fence,
right-click and use the Entity Display... option on the
object specific pop-up menu to Edit Display Props... On the Layer/
Color/ Linetype tab you can alter the Linetype (see
"fence_centerline_plan"), turn it and other components On or Off and even change
the Colors.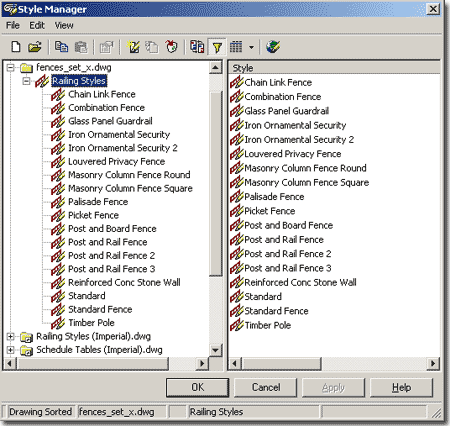
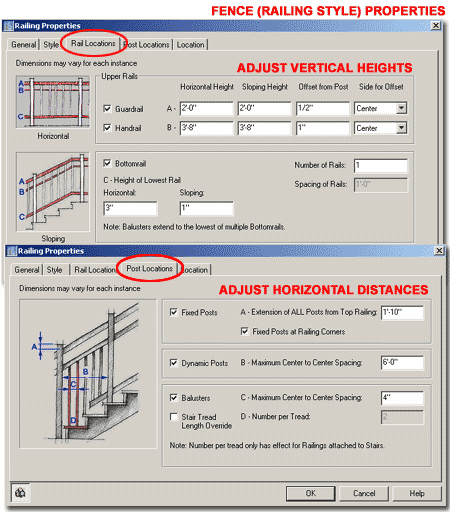
 We
have attempted to use as many of the native Railing components as possible so you can more
easily make unique adjustments but some fences rely on a lot of custom Block objects and
you many find adjustments difficult to manage. Illustrated to the right is the
Railing Properties dialog box that you can use to make basic changes to
the Heights and Distances for Guardrails,
Handrails, Bottomrails, Posts, Dynamic
( in between ) Posts and Balusters. By playing
with these settings you should be able to figure out how we attached some of the custom
blocks so you can control their heights. In the case of Fences, we did not use
Guardrails, Handrails and Balusters in the traditional translation of these terms but more
as controllers of other components.
We
have attempted to use as many of the native Railing components as possible so you can more
easily make unique adjustments but some fences rely on a lot of custom Block objects and
you many find adjustments difficult to manage. Illustrated to the right is the
Railing Properties dialog box that you can use to make basic changes to
the Heights and Distances for Guardrails,
Handrails, Bottomrails, Posts, Dynamic
( in between ) Posts and Balusters. By playing
with these settings you should be able to figure out how we attached some of the custom
blocks so you can control their heights. In the case of Fences, we did not use
Guardrails, Handrails and Balusters in the traditional translation of these terms but more
as controllers of other components.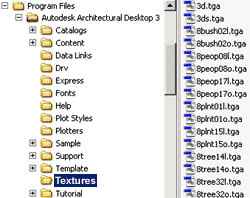 correct but you still don't see materials, you
may not have the default Material Library that comes with AutoCAD and Architectural
Desktop. You will need to get them from your Installation CD. The default
materials reside in a folder named "Textures" and this folder should be under
the AutoCAD or Architectural Desktop's location ( under Program Files on your computer ).
correct but you still don't see materials, you
may not have the default Material Library that comes with AutoCAD and Architectural
Desktop. You will need to get them from your Installation CD. The default
materials reside in a folder named "Textures" and this folder should be under
the AutoCAD or Architectural Desktop's location ( under Program Files on your computer ). appear as a Solid Black Color in shaded modes.
If you want to view your Model with this effect turned Off, use the WindowStyle
command to Edit the "Fence_chain_link" Window Style. On
the Display Props tab, make sure the Display Representation
is set for "Model" and then use the Edit Display
Props... button to access the Layer /Color/Linetype tab where
you can now turn Off the "Glass" Component.
appear as a Solid Black Color in shaded modes.
If you want to view your Model with this effect turned Off, use the WindowStyle
command to Edit the "Fence_chain_link" Window Style. On
the Display Props tab, make sure the Display Representation
is set for "Model" and then use the Edit Display
Props... button to access the Layer /Color/Linetype tab where
you can now turn Off the "Glass" Component.